Stripe Subscriptions using php – Download Full Source Code

Hi Guys,

In This blog article i am going to explain about STRIPE SUBSCRIPTIONS USING PHP and making available the source code also. by extending this code you can make a complete subscription management script.

Here in this article about

stripe subscriptions using php ,

i am going to create a pricing table where 3 type of plans are defined that plan will create on stripe if plan not exists on stripe panel and then create a customer and create a subscription in that customers reference.

Note: the Stripe account is the pre requisite for you , where we will require stripe publishable key and secret key.

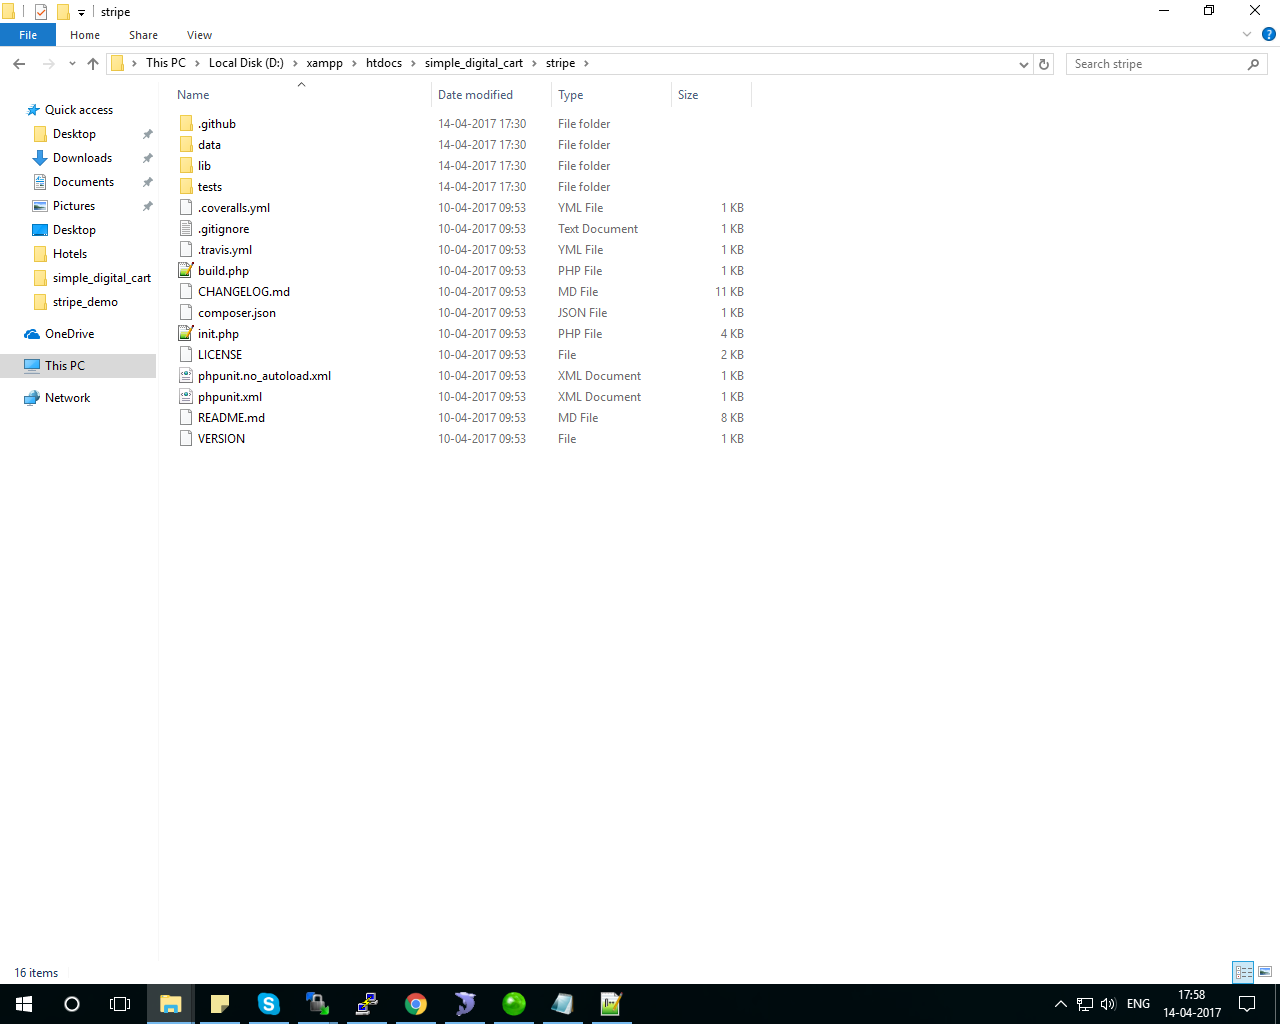
and the stripe php library will be require for including in config file so dont worry about the stripe php library it will be available in full source code download of this article.

Step 1: Create a config file and put following code :

<?php

require_once('stripe-php/init.php');

$stripe = array(
  "secret_key"      => "sk_test_456456546hgjhg",
  "publishable_key" => "pk_test_567hjhgjghgjhg"
);

\Stripe\Stripe::setApiKey($stripe['secret_key']);
?>

Note : you need to change the publishable key and secret key in this config file

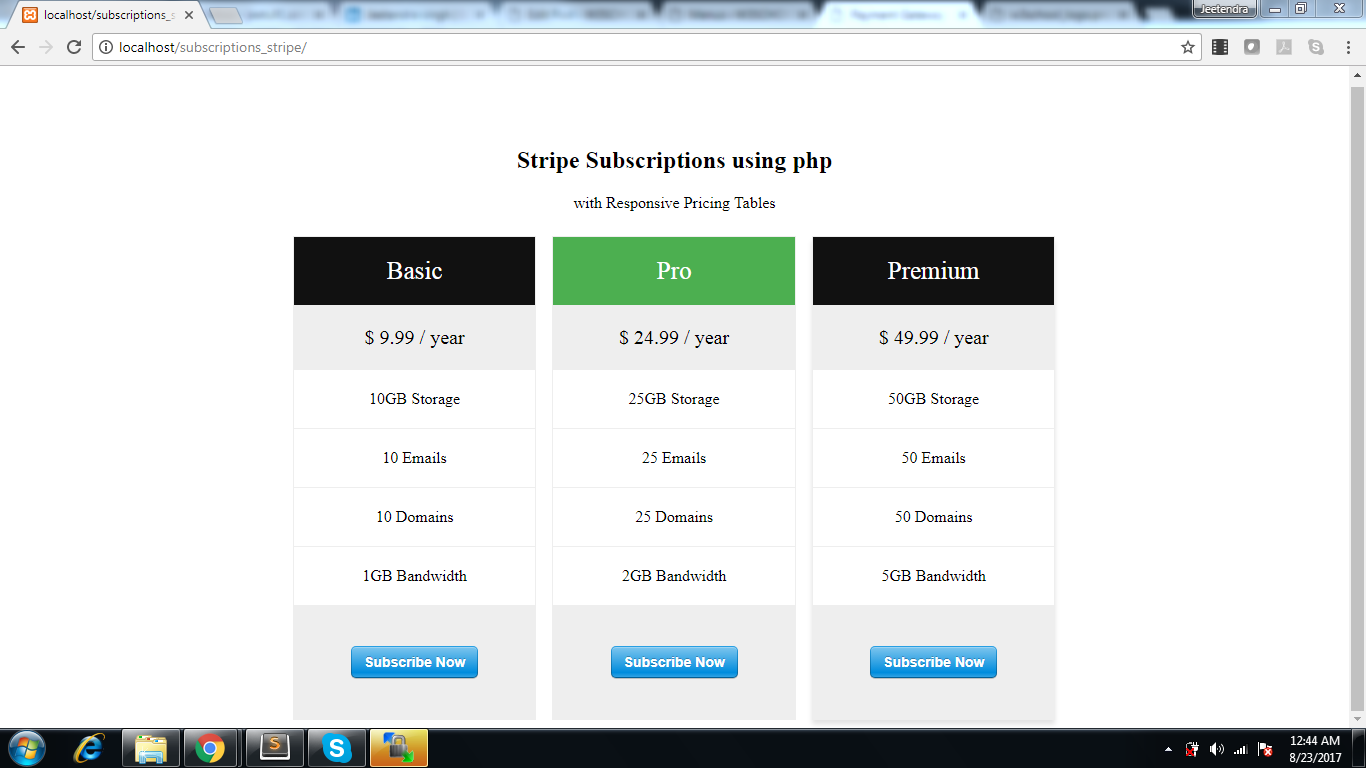
Step 2:  Create a file index.php where pricing table and stripe client side code will come as following :

<?php 
  // Load Stripe's PHP library and set your secret keys
  require_once("config.php"); 
  // Create the subscription
  require_once("create-subscription.php"); 
?>
<html>
  <head>
    <style>
      .spacing {
        margin-top:20px;
      }
      .success {
        color: #fff;
        background-color: green;
      }
      .error {
        color: #fff;
        background-color: red;
      }

    </style>
    <meta name="viewport" content="width=device-width, initial-scale=1.0">
  </head>
  <body>
    <?php if (isset($success)): ?>
      <div class='success'><?php echo $success; ?></div>
    <?php else: ?>
      <?php if (isset($error)): ?>
        <div class='error'><?php echo $error; ?></div>
      <?php endif ?>       
      
<style>
* {
    box-sizing: border-box;
}
body {
    margin:50px 0; 
    padding:0;
    text-align:center;
}

.content {
     
    margin:0 auto;
    text-align:left;
    padding:15px;
     
}

.columns {
    float: left;
    width: 33.3%;
    padding: 8px;
}

.price {
    list-style-type: none;
    border: 1px solid #eee;
    margin: 0;
    padding: 0;
    -webkit-transition: 0.3s;
    transition: 0.3s;
}

.price:hover {
    box-shadow: 0 8px 12px 0 rgba(0,0,0,0.2)
}

.price .header {
    background-color: #111;
    color: white;
    font-size: 25px;
}

.price li {
    border-bottom: 1px solid #eee;
    padding: 20px;
    text-align: center;
}

.price .grey {
    background-color: #eee;
    font-size: 20px;
}

.button {
    background-color: #4CAF50;
    border: none;
    color: white;
    padding: 10px 25px;
    text-align: center;
    text-decoration: none;
    font-size: 18px;
}

@media only screen and (max-width: 600px) {
    .columns {
        width: 100%;
    }
}
</style>
 
<div class="content" style="width:60%;">
<h2 style="text-align:center">Stripe Subscriptions using php</h2>
<p style="text-align:center">with Responsive Pricing Tables</p>

<div class="columns">
  <ul class="price">
    <li class="header">Basic</li>
    <li class="grey">$ 9.99 / year</li>
    <li>10GB Storage</li>
    <li>10 Emails</li>
    <li>10 Domains</li>
    <li>1GB Bandwidth</li>
    <li class="grey">

        <form action="" method="POST" class="spacing">
        <input name="plan" type="hidden" value="Basic" />         
        <input name="interval" type="hidden" value="year" />         
        <input name="price" type="hidden" value="9.99" />         
        <input name="currency" type="hidden" value="usd" />         
        <script
          src="https://checkout.stripe.com/checkout.js" class="stripe-button"
          data-key="<?php echo $stripe['publishable_key']; ?>"
          data-image="https://www.w3school.info/wp-content/uploads/2017/08/w3school_logo.png"
          data-name="BASIC PLAN"
          data-description="Start with basic plan"
          data-panel-label="Subscribe Now"
          data-label="Subscribe Now"
          data-locale="auto">
        </script>
      </form>
   

    </li>
  </ul>
</div>

<div class="columns">
  <ul class="price">
    <li class="header" style="background-color:#4CAF50">Pro</li>
    <li class="grey">$ 24.99 / year</li>
    <li>25GB Storage</li>
    <li>25 Emails</li>
    <li>25 Domains</li>
    <li>2GB Bandwidth</li>
    <li class="grey">
       <form action="" method="POST" class="spacing">
         
        <input name="plan" type="hidden" value="Pro" />         
        <input name="interval" type="hidden" value="year" />         
        <input name="price" type="hidden" value="24.99" />         
        <input name="currency" type="hidden" value="usd" />               
        <script
          src="https://checkout.stripe.com/checkout.js" class="stripe-button"
          data-key="<?php echo $stripe['publishable_key']; ?>"
          data-image="https://www.w3school.info/wp-content/uploads/2017/08/w3school_logo.png"
          data-name="Pro PLAN"
          data-description="Start with Pro plan"
          data-panel-label="Subscribe Now"
          data-label="Subscribe Now"
          data-locale="auto">
        </script>
      </form>
    </li>
  </ul>
</div>

<div class="columns">
  <ul class="price">
    <li class="header">Premium</li>
    <li class="grey">$ 49.99 / year</li>
    <li>50GB Storage</li>
    <li>50 Emails</li>
    <li>50 Domains</li>
    <li>5GB Bandwidth</li>
    <li class="grey">
<form action="" method="POST" class="spacing">     
        <input name="plan" type="hidden" value="Premium" />         
        <input name="interval" type="hidden" value="year" />         
        <input name="price" type="hidden" value="49.99" />         
        <input name="currency" type="hidden" value="usd" />           
        <script
          src="https://checkout.stripe.com/checkout.js" class="stripe-button"
          data-key="<?php echo $stripe['publishable_key']; ?>"
          data-image="https://www.w3school.info/wp-content/uploads/2017/08/w3school_logo.png"
          data-name="Premium PLAN"
          data-description="Start with Premium plan"
          data-panel-label="Subscribe Now"
          data-label="Subscribe Now"
          data-locale="auto">
        </script>
      </form>
    </li>
  </ul>
</div>

  <?php endif ?>  

</div>
  </body>
</html>

Note : here you have 3 plans listed with different subscription plan and data(like plan name,plan price,plan interval [month/year/week/day] and currency)  which are defined in hidden fields in every stripe form tag inside every pricing options.

Step 3: Now the Stripe Server Side code where after inputing the card details Actyual payment need to be done

So create a file create-subscription.php which is already included in index.php code in top lines, and this file wil have following Code:

<?php 
  // Check for a POSTed stripeToken and subscription
  if (isset($_POST['stripeToken']) && isset($_POST['plan'])){
    try {
	
	
	$plan = \Stripe\Plan::create(array(
			  "name" => $_POST['plan'],
			  "id" => "plan-".$_POST['plan'],
			  "interval" => $_POST['interval'],
			  "currency" => $_POST['currency'],
			  "amount" => $_POST['price']*100,
			));

	$customer = \Stripe\Customer::create(array(
	  "email" => $_POST['stripeEmail'],
	  "source" => $_POST['stripeToken'], // The token submitted from Checkout
	));
	
	\Stripe\Subscription::create(array(
	  "customer" => $customer->id,
	  "items" => array(
		array(
		  "plan" => "plan-".$_POST['plan'],
		),
	  ),
	));

     
      $success = "Thanks! You've subscribed to the " . $_POST['plan'] .  " plan.";
    }
    catch(\Stripe\Error\Card $e) {
      // Since it's a decline, \Stripe\Error\Card will be caught
      $body = $e->getJsonBody();
      $error  = $body['error']['message'];
    } 
    // Probably want to log all of these for later or send yourself a notification
    catch (\Stripe\Error\RateLimit $e) {
      $error = "Sorry, we weren't able to authorize your card. You have not been charged.";
    } catch (\Stripe\Error\InvalidRequest $e) {
      $error = "Sorry, we weren't able to authorize your card. You have not been charged.";
    } catch (\Stripe\Error\Authentication $e) {
      $error = "Sorry, we weren't able to authorize your card. You have not been charged.";
    } catch (\Stripe\Error\ApiConnection $e) {
      $error = "Sorry, we weren't able to authorize your card. You have not been charged.";
    } catch (\Stripe\Error\Base $e) {
      $error = "Sorry, we weren't able to authorize your card. You have not been charged.";
    } catch (Exception $e) {
      $error = "Sorry, we weren't able to authorize your card. You have not been charged.";
    }
  }
?>

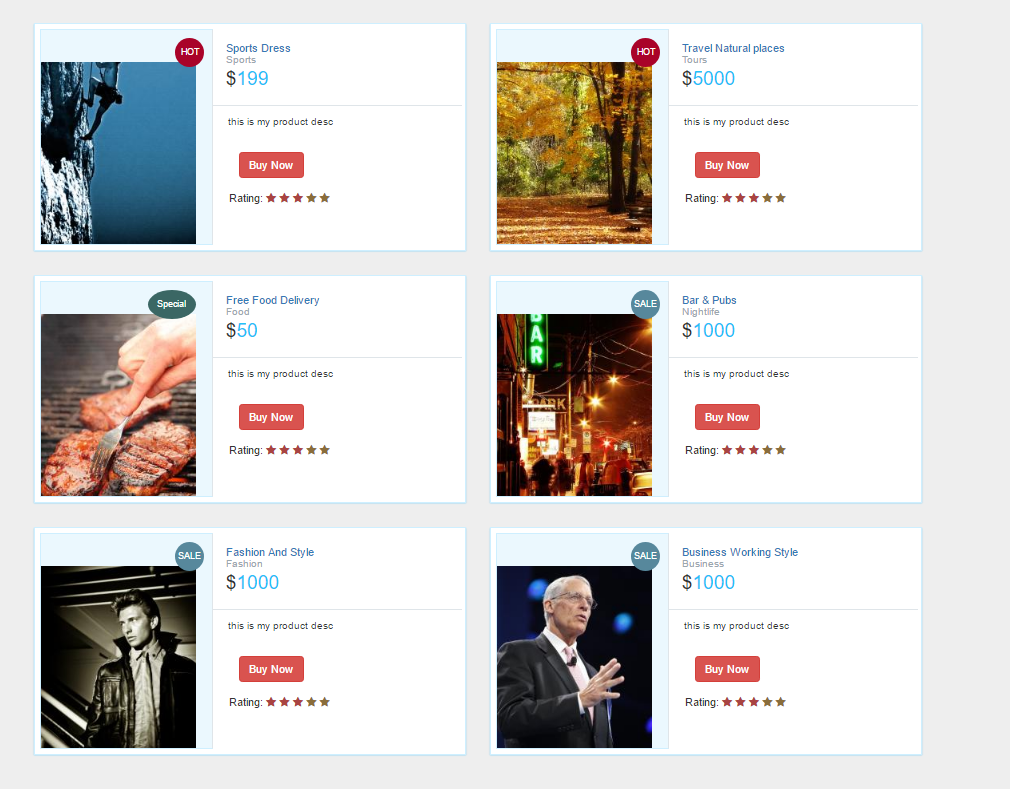
Now you are Ready  it will look like this :

stripe subscriptions preview

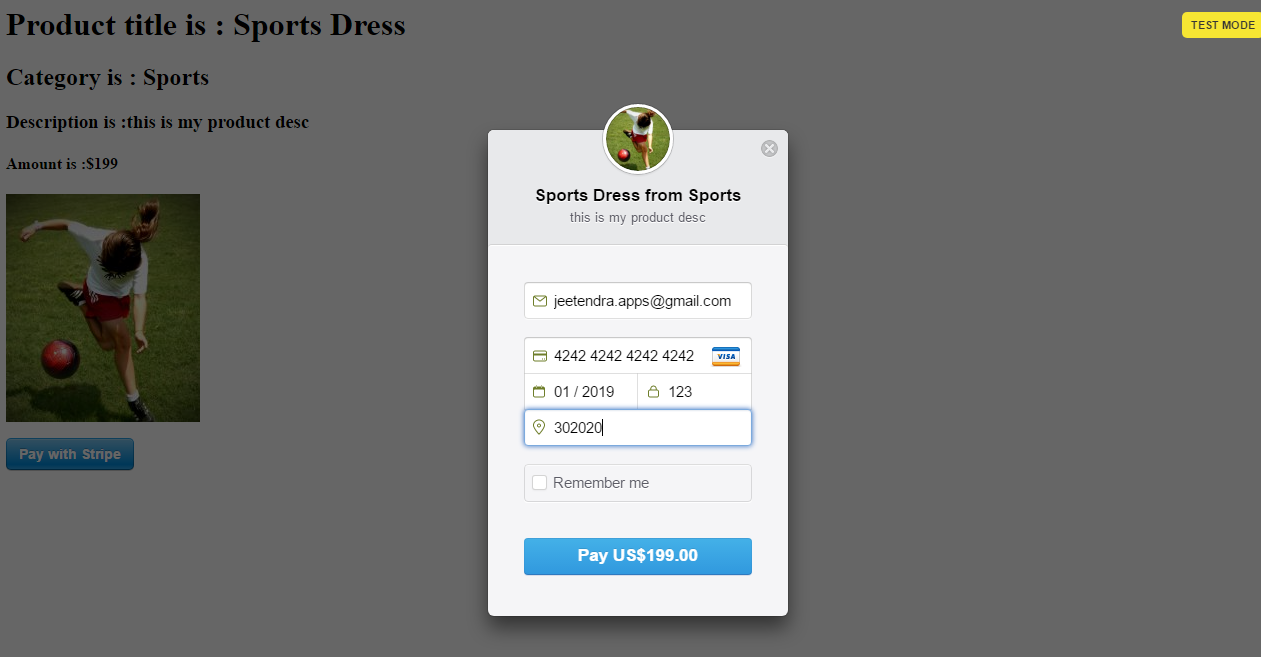
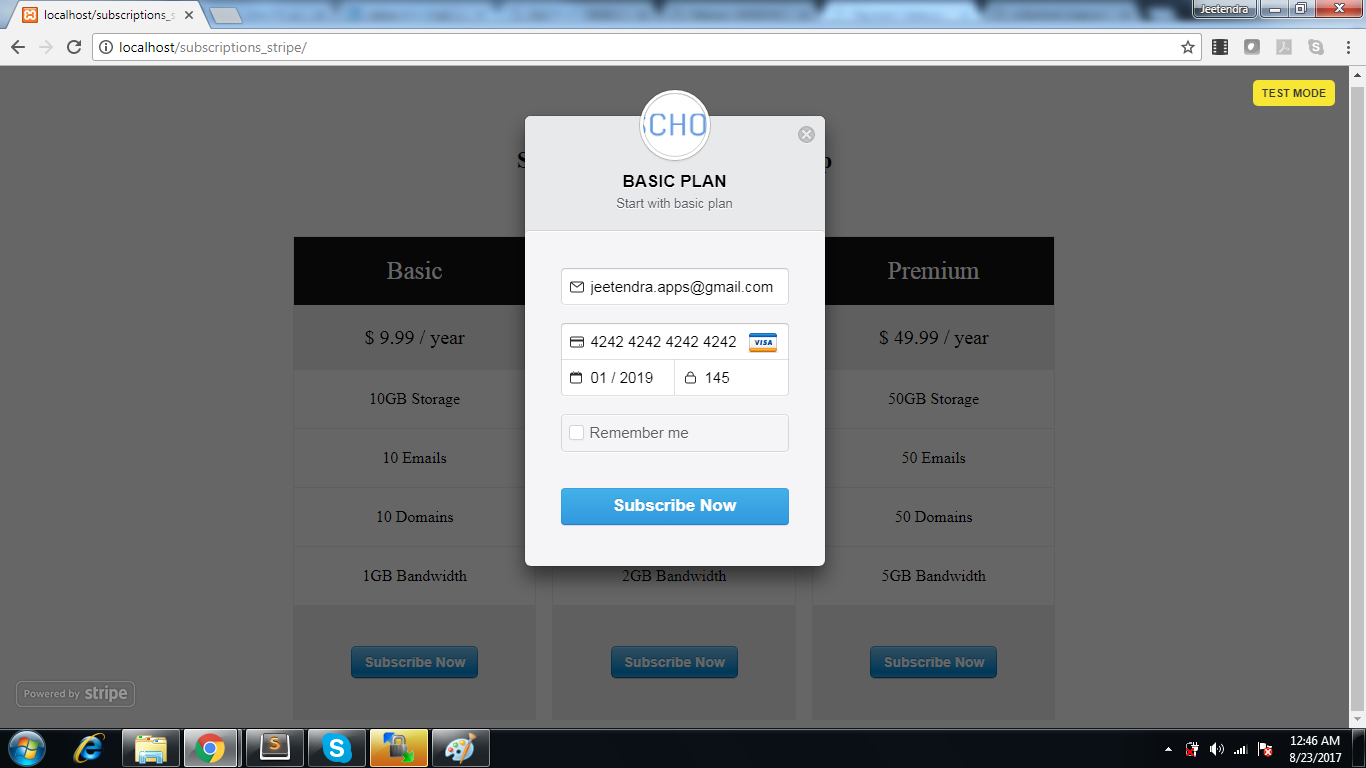
and if we click on any subscription button it will prompt a stripe popup like this

stripe subscriptions credit card promt by stripe
stripe subscriptions credit card prompt by stripe

Click HERE to download full source code

Note: this is completely Free script.

if you have any trouble in download this then please contact me at [email protected] or ask query in comments below

Implement Stripe in 3 steps using php

Hi Geeks,
This Article is focused on Implement Stripe in 3 steps using php, where you can easily accept payments through stripe by using this code. the stripe checkout.js
is used here with server side code also.

Step 1: Create a product list page named index.php with following code:

<!DOCTYPE html>
<html>
<head>
 
  <meta name="author" content="jeetendra singh">
	<title>Digital cart demo with Stripe checkout</title>
   	<meta name="description" content="stripe product listing here">

<link rel="stylesheet" href="https://maxcdn.bootstrapcdn.com/bootstrap/3.3.5/css/bootstrap.min.css" >
<link href="https://maxcdn.bootstrapcdn.com/font-awesome/4.3.0/css/font-awesome.min.css" rel="stylesheet">
<style>
body{
    margin-top:20px;
    background:#eee;
}

.prod-info-main {
    border: 1px solid #CEEFFF;
    margin-bottom: 20px;
    margin-top: 10px;
    background: #fff;
    padding: 6px;
    -webkit-box-shadow: 0 1px 4px 0 rgba(21,180,255,0.5);
    box-shadow: 0 1px 1px 0 rgba(21,180,255,0.5);
}

.prod-info-main .product-image {
    background-color: #EBF8FE;
    display: block;
    min-height: 238px;
    overflow: hidden;
    position: relative;
    border: 1px solid #CEEFFF;
    padding-top: 40px;
}

.prod-info-main .product-deatil {
    border-bottom: 1px solid #dfe5e9;
    padding-bottom: 17px;
    padding-left: 16px;
    padding-top: 16px;
    position: relative;
    background: #fff
}

.product-content .product-deatil h5 a {
    color: #2f383d;
    font-size: 15px;
    line-height: 19px;
    text-decoration: none;
    padding-left: 0;
    margin-left: 0
}

.prod-info-main .product-deatil h5 a span {
    color: #9aa7af;
    display: block;
    font-size: 13px
}

.prod-info-main .product-deatil span.tag1 {
    border-radius: 50%;
    color: #fff;
    font-size: 15px;
    height: 50px;
    padding: 13px 0;
    position: absolute;
    right: 10px;
    text-align: center;
    top: 10px;
    width: 50px
}

.prod-info-main .product-deatil span.sale {
    background-color: #21c2f8
}

.prod-info-main .product-deatil span.discount {
    background-color: #71e134
}

.prod-info-main .product-deatil span.hot {
    background-color: #fa9442
}

.prod-info-main .description {
    font-size: 12.5px;
    line-height: 20px;
    padding: 10px 14px 16px 19px;
    background: #fff
}

.prod-info-main .product-info {
    padding: 11px 19px 10px 20px
}

.prod-info-main .product-info a.add-to-cart {
    color: #2f383d;
    font-size: 13px;
    padding-left: 16px
}

.prod-info-main name.a {
    padding: 5px 10px;
    margin-left: 16px
}

.product-info.smart-form .btn {
    padding: 6px 12px;
    margin-left: 12px;
    margin-top: -10px
}

.load-more-btn {
    background-color: #21c2f8;
    border-bottom: 2px solid #037ca5;
    border-radius: 2px;
    border-top: 2px solid #0cf;
    margin-top: 20px;
    padding: 9px 0;
    width: 100%
}

.product-block .product-deatil p.price-container span,
.prod-info-main .product-deatil p.price-container span,
.shipping table tbody tr td p.price-container span,
.shopping-items table tbody tr td p.price-container span {
    color: #21c2f8;
    font-family: Lato, sans-serif;
    font-size: 24px;
    line-height: 20px
}

.product-info.smart-form .rating label {
    margin-top:15px;
    
}

.prod-wrap .product-image span.tag2 {
    position: absolute;
    top: 10px;
    right: 10px;
    width: 36px;
    height: 36px;
    border-radius: 50%;
    padding: 10px 0;
    color: #fff;
    font-size: 11px;
    text-align: center
}

.prod-wrap .product-image span.tag3 {
    position: absolute;
    top: 10px;
    right: 20px;
    width: 60px;
    height: 36px;
    border-radius: 50%;
    padding: 10px 0;
    color: #fff;
    font-size: 11px;
    text-align: center
}

.prod-wrap .product-image span.sale {
    background-color: #57889c;
}

.prod-wrap .product-image span.hot {
    background-color: #a90329;
}

.prod-wrap .product-image span.special {
    background-color: #3B6764;
}
.shop-btn {
    position: relative
}

.shop-btn>span {
    background: #a90329;
    display: inline-block;
    font-size: 10px;
    box-shadow: inset 1px 1px 0 rgba(0, 0, 0, .1), inset 0 -1px 0 rgba(0, 0, 0, .07);
    font-weight: 700;
    border-radius: 50%;
    padding: 2px 4px 3px!important;
    text-align: center;
    line-height: normal;
    width: 19px;
    top: -7px;
    left: -7px
}

.product-deatil hr {
    padding: 0 0 5px!important
}

.product-deatil .glyphicon {
    color: #3276b1
}

.product-deatil .product-image {
    border-right: 0px solid #fff !important
}

.product-deatil .name {
    margin-top: 0;
    margin-bottom: 0
}

.product-deatil .name small {
    display: block
}

.product-deatil .name a {
    margin-left: 0
}

.product-deatil .price-container {
    font-size: 24px;
    margin: 0;
    font-weight: 300;
    
}

.product-deatil .price-container small {
    font-size: 12px;
    
}

.product-deatil .fa-2x {
    font-size: 16px!important
}

.product-deatil .fa-2x>h5 {
    font-size: 12px;
    margin: 0
}

.product-deatil .fa-2x+a,
.product-deatil .fa-2x+a+a {
    font-size: 13px
}

.product-deatil .certified {
    margin-top: 10px
}

.product-deatil .certified ul {
    padding-left: 0
}

.product-deatil .certified ul li:not(first-child) {
    margin-left: -3px
}

.product-deatil .certified ul li {
    display: inline-block;
    background-color: #f9f9f9;
    padding: 13px 19px
}

.product-deatil .certified ul li:first-child {
    border-right: none
}

.product-deatil .certified ul li a {
    text-align: left;
    font-size: 12px;
    color: #6d7a83;
    line-height: 16px;
    text-decoration: none
}

.product-deatil .certified ul li a span {
    display: block;
    color: #21c2f8;
    font-size: 13px;
    font-weight: 700;
    text-align: center
}

.product-deatil .message-text {
    width: calc(100% - 70px)
}

@media only screen and (min-width:1024px) {
    .prod-info-main div[class*=col-md-4] {
        padding-right: 0
    }
    .prod-info-main div[class*=col-md-8] {
        padding: 0 13px 0 0
    }
    .prod-wrap div[class*=col-md-5] {
        padding-right: 0
    }
    .prod-wrap div[class*=col-md-7] {
        padding: 0 13px 0 0
    }
    .prod-info-main .product-image {
        border-right: 1px solid #dfe5e9
    }
    .prod-info-main .product-info {
        position: relative
    }
}
</style>

</head>

<body>
<div class="container">
<div class="col-xs-12 col-md-6">
	<!-- First product box start here-->
	<div class="prod-info-main prod-wrap clearfix">
		<div class="row">
				<div class="col-md-5 col-sm-12 col-xs-12">
					<div class="product-image"> 
						<img src="https://lorempixel.com/194/228/sports/" class="img-responsive"> 
						<span class="tag2 hot">
							HOT
						</span> 
					</div>
				</div>
				<div class="col-md-7 col-sm-12 col-xs-12">
				<div class="product-deatil">
						<h5 class="name">
							<a class="title" href="javascript:void(0)">
								Sports Dress
							</a>
							<a class="category"  href="javascript:void(0)">
								<span>Sports</span>
							</a>                            

						</h5>
						<p class="price-container">
							$<span class="price" >199</span>
						</p>
						<span class="tag1"></span> 
				</div>
				<div class="description">
					<p class="desc">this is my product desc </p>
				</div>
				<div class="product-info smart-form">
					<div class="row">
						<div class="col-md-12"> 
							<a href="javascript:void(0);" class="btn btn-danger stripe_pay">Buy Now</a>
                            
						</div>
						<div class="col-md-12">
							<div class="rating">Rating:
								<label for="stars-rating-5"><i class="fa fa-star text-danger"></i></label>
								<label for="stars-rating-4"><i class="fa fa-star text-danger"></i></label>
								<label for="stars-rating-3"><i class="fa fa-star text-danger"></i></label>
								<label for="stars-rating-2"><i class="fa fa-star text-warning"></i></label>
								<label for="stars-rating-1"><i class="fa fa-star text-warning"></i></label>
							</div>
						</div>
					</div>
				</div>
			</div>
		</div>
	</div>
	<!-- end product -->
</div>
<div class="col-xs-12 col-md-6">
	<!-- First product box start here-->
	<div class="prod-info-main prod-wrap clearfix">
		<div class="row">
				<div class="col-md-5 col-sm-12 col-xs-12">
					<div class="product-image"> 
						<img src="https://lorempixel.com/194/228/nature/" alt="194x228" class="img-responsive"> 
						<span class="tag2 hot">
							HOT
						</span> 
					</div>
				</div>
				<div class="col-md-7 col-sm-12 col-xs-12">
				<div class="product-deatil">
						<h5 class="name">
							<a class="title" href="javascript:void(0)">
								  Travel Natural places <span class="category" >Tours</span>
							</a>
						</h5>
						<p class="price-container">
							$<span class="price" >5000</span>
						</p>
						<span class="tag1"></span> 
				</div>
				<div class="description">
					<p class="desc">this is my product desc </p>
				</div>
				<div class="product-info smart-form">
					<div class="row">
						<div class="col-md-12"> 
							<a href="javascript:void(0);" class="btn btn-danger stripe_pay">Buy Now</a>
                            
						</div>
						<div class="col-md-12">
							<div class="rating">Rating:
								<label for="stars-rating-5"><i class="fa fa-star text-danger"></i></label>
								<label for="stars-rating-4"><i class="fa fa-star text-danger"></i></label>
								<label for="stars-rating-3"><i class="fa fa-star text-danger"></i></label>
								<label for="stars-rating-2"><i class="fa fa-star text-warning"></i></label>
								<label for="stars-rating-1"><i class="fa fa-star text-warning"></i></label>
							</div>
						</div>
					</div>
				</div>
			</div>
		</div>
	</div>
	<!-- end product -->
</div>
<div class="col-xs-12 col-md-6">
<!-- First product box start here-->
	<div class="prod-info-main prod-wrap clearfix">
		<div class="row">
				<div class="col-md-5 col-sm-12 col-xs-12">
					<div class="product-image"> 
						<img src="https://lorempixel.com/194/228/food/" alt="194x228" class="img-responsive"> 
						<span class="tag3 special">
							Special
						</span> 
					</div>
				</div>
				<div class="col-md-7 col-sm-12 col-xs-12">
				<div class="product-deatil">
						<h5 class="name">
							<a class="title"  href="javascript:void(0)">
								Free Food Delivery<span class="category" >Food</span>
							</a>
						</h5>
						<p class="price-container">
							$<span class="price"  >50</span>
						</p>
						<span class="tag1"></span> 
				</div>
				<div class="description">
					<p class="desc">this is my product desc </p>
				</div>
				<div class="product-info smart-form">
					<div class="row">
						<div class="col-md-12"> 
							<a href="javascript:void(0);" class="btn btn-danger stripe_pay">Buy Now</a>
                            
						</div>
						<div class="col-md-12">
							<div class="rating">Rating:
								<label for="stars-rating-5"><i class="fa fa-star text-danger"></i></label>
								<label for="stars-rating-4"><i class="fa fa-star text-danger"></i></label>
								<label for="stars-rating-3"><i class="fa fa-star text-danger"></i></label>
								<label for="stars-rating-2"><i class="fa fa-star text-warning"></i></label>
								<label for="stars-rating-1"><i class="fa fa-star text-warning"></i></label>
							</div>
						</div>
					</div>
				</div>
			</div>
		</div>
	</div>
	<!-- end product -->
</div>
<div class="col-xs-12 col-md-6">
	<!-- First product box start here-->
	<div class="prod-info-main prod-wrap clearfix">
		<div class="row">
				<div class="col-md-5 col-sm-12 col-xs-12">
					<div class="product-image"> 
						<img src="https://lorempixel.com/194/228/nightlife/" alt="194x228" class="img-responsive"> 
						<span class="tag2 sale">
							SALE
						</span> 
					</div>
				</div>
				<div class="col-md-7 col-sm-12 col-xs-12">
				<div class="product-deatil">
						<h5 class="name">
							<a class="title" href="javascript:void(0)">
								Bar & Pubs <span class="category" >Nightlife</span>
							</a>
						</h5>
						<p class="price-container">
							$<span class="price" >1000</span>
						</p>
						<span class="tag1"></span> 
				</div>
				<div class="description">
					<p class="desc">this is my product desc </p>
				</div>
				<div class="product-info smart-form">
					<div class="row">
						<div class="col-md-12"> 
							<a href="javascript:void(0);" class="btn btn-danger stripe_pay">Buy Now</a>
                            
						</div>
						<div class="col-md-12">
							<div class="rating">Rating:
								<label for="stars-rating-5"><i class="fa fa-star text-danger"></i></label>
								<label for="stars-rating-4"><i class="fa fa-star text-danger"></i></label>
								<label for="stars-rating-3"><i class="fa fa-star text-danger"></i></label>
								<label for="stars-rating-2"><i class="fa fa-star text-warning"></i></label>
								<label for="stars-rating-1"><i class="fa fa-star text-warning"></i></label>
							</div>
						</div>
					</div>
				</div>
			</div>
		</div>
	</div>
	<!-- end product -->


</div>


<div class="col-xs-12 col-md-6">
	<!-- First product box start here-->
	<div class="prod-info-main prod-wrap clearfix">
		<div class="row">
				<div class="col-md-5 col-sm-12 col-xs-12">
					<div class="product-image"> 
						<img src="https://lorempixel.com/194/228/fashion/" alt="194x228" class="img-responsive"> 
						<span class="tag2 sale">
							SALE
						</span> 
					</div>
				</div>
				<div class="col-md-7 col-sm-12 col-xs-12">
				<div class="product-deatil">
						<h5 class="name">
							<a class="title"  href="javascript:void(0)">
								Fashion And Style <span class="category" >Fashion</span>
							</a>
						</h5>
						<p class="price-container">
							$<span class="price" >1000</span>
						</p>
						<span class="tag1"></span> 
				</div>
				<div class="description">
					<p class="desc">this is my product desc </p>
				</div>
				<div class="product-info smart-form">
					<div class="row">
						<div class="col-md-12"> 
							<a href="javascript:void(0);" class="btn btn-danger stripe_pay">Buy Now</a>
                            
						</div>
						<div class="col-md-12">
							<div class="rating">Rating:
								<label for="stars-rating-5"><i class="fa fa-star text-danger"></i></label>
								<label for="stars-rating-4"><i class="fa fa-star text-danger"></i></label>
								<label for="stars-rating-3"><i class="fa fa-star text-danger"></i></label>
								<label for="stars-rating-2"><i class="fa fa-star text-warning"></i></label>
								<label for="stars-rating-1"><i class="fa fa-star text-warning"></i></label>
							</div>
						</div>
					</div>
				</div>
			</div>
		</div>
	</div>
	<!-- end product -->


</div>

<div class="col-xs-12 col-md-6">
	<!-- First product box start here-->
	<div class="prod-info-main prod-wrap clearfix">
		<div class="row">
				<div class="col-md-5 col-sm-12 col-xs-12">
					<div class="product-image"> 
						<img src="https://lorempixel.com/194/228/business/" alt="194x228" class="img-responsive"> 
						<span class="tag2 sale">
							SALE
						</span> 
					</div>
				</div>
				<div class="col-md-7 col-sm-12 col-xs-12">
				<div class="product-deatil">
						<h5 class="name">
							<a class="title"  href="javascript:void(0)">
								Business Working Style <span class="category" >Business</span>
							</a>
						</h5>
						<p class="price-container">
							$<span class="price" >1000</span>
						</p>
						<span class="tag1"></span> 
				</div>
				<div class="description">
					<p class="desc">this is my product desc </p>
				</div>
				<div class="product-info smart-form">
					<div class="row">
						<div class="col-md-12"> 
							<a href="javascript:void(0);" class="btn btn-danger stripe_pay">Buy Now</a>
                            
						</div>
						<div class="col-md-12">
							<div class="rating">Rating:
								<label for="stars-rating-5"><i class="fa fa-star text-danger"></i></label>
								<label for="stars-rating-4"><i class="fa fa-star text-danger"></i></label>
								<label for="stars-rating-3"><i class="fa fa-star text-danger"></i></label>
								<label for="stars-rating-2"><i class="fa fa-star text-warning"></i></label>
								<label for="stars-rating-1"><i class="fa fa-star text-warning"></i></label>
							</div>
						</div>
					</div>
				</div>
			</div>
		</div>
	</div>
	<form action="pay.php" id="pay_form" method="post">
		<input type="hidden" name="price" />
		<input type="hidden" name="title" />
		<input type="hidden" name="category" />
		<input type="hidden" name="image" />
		<input type="hidden" name="desc" />
		<input type="hidden" name="_pay_" value="1" />
	</form>
	<!-- end product -->
	<script
  src="https://code.jquery.com/jquery-1.12.4.min.js"
  integrity="sha256-ZosEbRLbNQzLpnKIkEdrPv7lOy9C27hHQ+Xp8a4MxAQ="
  crossorigin="anonymous"></script>
	 <script>
	 $(document).ready(function(){
		 
		$(".stripe_pay").click(function(){
	    var obj_prd=$(this).parents('.prod-info-main');
		
		var price=obj_prd.find('.price').text();
		var title=obj_prd.find('.title').text();
		var desc=obj_prd.find('.desc').text();
		var category=obj_prd.find('.category').text();
		var img=obj_prd.find('.product-image img').attr('src');
	 console.log(img)
	 
		 
		 $("input[name='price']").val(price);
		 $("input[name='title']").val(title);
		 $("input[name='desc']").val(desc);
		 $("input[name='category']").val(category);
		 $("input[name='image']").val(img);
	
	      $("#pay_form").submit();

		});		
		 
	 });
	 
	 </script>


</div>
</div>
</body>
</html>

Output Screen for this will look like this:

1

Note: you can get products from database also,but here for demonstration i am showing these static.

Step 2: Create a Checkout Page with name pay.php, here you need to replace the stripe public key mention in the comment also.

<html lang="en">

<head>
    <meta charset="utf-8">
    <meta http-equiv="X-UA-Compatible" content="IE=edge">
    <meta name="viewport" content="width=device-width, initial-scale=1">
    <meta name="author" content="jeetendra singh">
	<title>Stripe Checkout demo</title>
   	<meta name="description" content="stripe checkout demo here">

    </head>
	<body>
<?php if(isset($_POST['_pay_'])) {?>
 <h1>Product title is :<?php echo $_POST['title']; ?></h1>
 <h2>Category is : <?php echo $_POST['category']; ?></h2>
 <h3>Description is :<?php echo $_POST['desc']; ?></h3>
 <h4>Amount is :$<?php echo $_POST['price']; ?></h4>
 <p><img src="<?php echo $_POST['image']; ?>" /></p>
 
<form action="charge.php" method="POST">
<input type="hidden" name="stripePrice" value="<?php echo $_POST['price']*100;//stripe takes in cents ?>" />
<!--replace stripe public key in data-key attr in script tag-->
		  <script
			src="https://checkout.stripe.com/checkout.js" class="stripe-button"
			data-key="pk_test_6pRNASCoBOKtIshFeQd4XMUh"
			data-label="Pay with Stripe"
			data-amount="<?php echo $_POST['price']*100; ?>"
			data-name="<?php echo $_POST['title']." from ".$_POST['category']; ?>"
			data-description="<?php echo $_POST['desc']; ?>"
			data-image="<?php echo $_POST['image']; ?>"
			data-locale="auto"
			data-zip-code="true">
		  </script>
		 </form>
<?php }?>
</body>
</html>

Output Screen:

2

Step 3: Create a server side script for charge customer named as charge.php with following code, here you need to replace the Stripe private key mention in comment also:

<html lang="en">

<head>
    <meta charset="utf-8">
    <meta http-equiv="X-UA-Compatible" content="IE=edge">
    <meta name="viewport" content="width=device-width, initial-scale=1">
    <meta name="author" content="jeetendra singh">
   	<meta name="description" content="stripe server side code demo here">
    <title>FINAL PAYMENT STATUS- STRIPE SERVER SIDE CODE DEMO</title>
	 
</head>
<body>		
<?php
require_once('./stripe/init.php');

if(isset($_POST['stripeToken']) && $_POST['stripeToken']!=""){


	 // Set secret key
  \Stripe\Stripe::setApiKey("sk_test_g0654565464569");//replace your secreet key of stripe here

  // Get the credit card details submitted by the form
  $token = $_POST['stripeToken'];

  // Create the charge on Stripe's servers - this will charge the user's card
  try {
    $customer = \Stripe\Customer::create(array(
      'email' => $_POST['stripeEmail'],
      'source'  => $token
    ));

    $charge = \Stripe\Charge::create(array(
      "amount" => $_POST['stripePrice'],
      "currency" => "usd",
      "customer" => $customer->id
      ));

    echo "<h1 style='color:green'>PAYMENT SUCCESSFULLY DONE</h1>";


  } catch(\Stripe\Error\Card $e) {
    // The card has been declined
    echo "<h1 style='color:red'>PAYMENT FAILED!</h1>";
  }


}
?>

Output Screen:

3

Note: there should be a stripe library in the root folder you can download it from here:
https://github.com/stripe/stripe-php/archive/v4.7.0.zip
and extract it with name stripe as you can see in following screenshot

4

Still you have any problem in integrating you can directly call me and i will send you the complete working code,

you can comment here or send me a email on [email protected]

Thanks


Radio and Checkbox use in Angularjs Post method

Hi Geeks,

When I was working with angular form posts then I was tried  radio and checkboxes as normal inputs in angular js form post then it is sending [Object Object] to the webservices and that object couldn’t be parsed by the server-end , and also inserted [Object Object] text into the database also.

But I need to send the controls in key val pair So I Write following code written to sent it, These are the steps which I follow to achieve it.

First  I created the Html controls like this :

<!— html radio box for item condition —>
<div class="form-group">
        <label class="checkbox-inline"> <input name="condition1"  type="radio"  value="Bad" ng-model="postAdd.condition1">Bad</label>
        <label class="checkbox-inline"> <input name="condition1"  type="radio"   ng-checked="true" value="Good"  ng-model="postAdd.condition1">Good</label>
        <label class="checkbox-inline"><input name="condition1"  type="radio"   value="Better" ng-model="postAdd.condition1">Better </label>
    </div>
<!— html radio box for item condition —>
  <!—html checkbox  for item type --->
<div class="form-group">
   <label class="checkbox-inline"> <input name="prd_type"  type="checkbox"  ng-model=" postAdd .prd_type.Car">Car</label>
  <label class="checkbox-inline"><input name="prd_type"  type="checkbox"  ng-model=" postAdd .prd_type.Byke">Byke</label>  
  <label class="checkbox-inline"> <input name="prd_type"  type="checkbox"  ng-model="prd_type.Tv">TV</label> 
    </div>
  <!—html checkbox  for item type --->


Now in your Controller ‘s  submit function ( I am assuming that you have already go through my previous article for form process in angular js or you already aware with form processing in angular js ) as following:

//collect the radio opted value data in a var
 var single_option= $scope. postAdd.condition1;//it will come directly because same group for radio will get only the selected value
//collect the checkboxes data in a var with comma seperated
 var checked_items=””;
 angular.forEach($scope. postAdd .prd_type, function(val,key) {        checked_items+=","+key;        });


Now complete post action  inside the respective controller will look like this

$scope.submit_form = function()
{ 
        $http({
                        url: base_url+"services.do/add_business",//or your service url
                        method: "POST",
            processData: false,
                        headers: { 'Content-Type': undefined },
            data : $scope. postAdd,//it will get all other normal text or select inputs in the form form  using common modal >> postAdd  
            transformRequest: function (data) {
            var formData = new FormData();
	     //collect the radio opted value data in a var
 var single_option= $scope. postAdd.condition1;//it will come directly because same group for radio will get only the selected value
formData.append(“item_condition”, single_option);
//collect the checkboxes data in a var with comma seperated
 var checked_items=””;
 angular.forEach($scope. postAdd .prd_type, function(val,key) {        checked_items+=","+key;        });
  formData.append(“item_types”, checked_items);
            return formData;  
            }, 
                    }).success(function(data, status, headers, config) {
	              //success callback, show success or alert depends on return data in first callback response named > data
   console.log("form submitted successfully");
                    }).error(function(data, status, headers, config) {
                                       //error callback here
console.log("Error in form process");
                    });
           
 }

you can ask any confusion and if something not clear then put your query in comments , i will type to reply on same and try to resolve your problem where you stucked


Image or file Upload in angular js

This tutorial is based on Image or file Upload in angular js . i am providing simple steps to image or file upload , I am assuming that you have already submitted the form using angular js, i have provided all steps in my previous tutorial
Now follow these steps in existing one:

add input type file inside your form as following:

<p>Image/File:<br/>
<input type="file"  name="image" onchange="angular.element(this).scope().uploadedFile(this);" class="form-control" required >
</p>
<p ng-show="myform.image.$invalid && !myform.image.$pristine" class="help-block">Image/File is required.</p>

In above code we have passed a method name  ‘uploadedFile’ in onchange of that input type file so need to create that function in our existing controller as following:

$scope.uploadedFile = function(element) {     
 
 $scope.$apply(function($scope) {
   $scope.files = element.files;  
 });
 
}

now we need to make some modification(related to add files and header info) and need to add transformRequest param, in our http post method as following:

  $http({
                        url: "http://localhost/web_services/add_enquiry.php",//or your add enquiry services
                        method: "POST",
                        processData: false,
						 headers: { 'Content-Type': undefined },
						data : $scope.formdata,
						transformRequest: function (data) {
						  var formData = new FormData();
						    var file = $scope.files[0];
						   formData.append("file_upload",file); //pass the key name by which we will recive the file
						 
						   angular.forEach(data, function (value, key) 
						  {
							  formData.append(key, value);
						  });
						   
						return formData;  
						},
			 
                    }).success(function(data, status, headers, config) {
                       $scope.status=data.status;
						 if($scope.status==1)
						 {
						   $scope.formdata="";
						   $scope.myform.$setPristine();//for flush all the validation errors/messages previously
						   alert(data.message);
						 }
						 else
						 {
						  alert(data.message);
						 }
                         
                    }).error(function(data, status, headers, config) {
                         alert("Something Error in form process");
                    });

Now we can easily Recieve the image or file with ‘file_upload’ named field in php $_FILES array in our webservice, we need to save the file in uploads or any other folder and save its name to database as follow.

<?php
					if(!isset($_FILES['file_upload']))
					{
						$response=array("status"=>0,"message"=>"File not choosen!");
						print json_encode($response);
						exit;
					}
					$f_name=uniqid("img_").str_replace(" ","-",$_FILES['file_upload']['name']);
					$target_file="./uploads/".$f_name;
					if(!move_uploaded_file($_FILES['file_upload']['tmp_name'], $target_file))
					{
						
						$response=array("status"=>0,"message"=>"File Upload Failed!");
						print json_encode($response);
						exit;
						
					}


					$uploaded_file=$f_name; //now in your further code/insert query you can use $uploaded_file varriable as file name into your db 
					
					
					 //your further code here//
					 //.....//
					 //.....//
					 //.....//
				     	
					
				?>


Form Processing and validation in Angular js

Hi Geeks,

In this tutorial you will learn form processing and validation in angular js. where i have focused on validation in angular js, and after validation save the formdata to server/database using webservice.

Step 1: Include the angular js in head section by

<script src="https://ajax.googleapis.com/ajax/libs/angularjs/1.5.8/angular.min.js"></script>

Step 2:Define app name in body tag

<body ng-app="MyApp">

Step 3: Create a controller div, and for this controller we will write handler in javascript code

<div ng-controller="contactForm_CTRL">

Step 4 : Create your form inside controller div and take name of that form it will use in validation the form fields

<form name="myform" method="post" novalidate ng-submit="submit_form()"  >

<p>Full Name:<br/>
<input type="text" name="full_name" ng-model="formdata.full_name" required />
</p>
<p ng-show="myform.full_name.$invalid && !myform.full_name.$pristine" style="color:red">Your Name is required.</p>

<p>Email:<br/>
<input  ng-pattern="/^[^\s@]+@[^\s@]+\.[^\s@]{2,}$/" type="email" ng-model="formdata.email" name="email"  required />
</p>
<p ng-show="myform.email.$invalid && !myform.email.$pristine" style="color:red">Your Email is required/Invalid.</p>

<p>Mobile:<br/>
  +91-<input ng-minlength="10" ng-maxlength="10" type="number" ng-model="formdata.mobile" name="mobile"  required />
 </p>
<p ng-show="myform.mobile.$invalid && !myform.mobile.$pristine" style="color:red">Your Mobile is required/Invalid.</p>

<p>Message:<br/>
 <textarea ng-model="formdata.message" name="message" rows="8" class="form-control" required /></textarea>
 </p>
 <p ng-show="myform.message.$invalid && !myform.message.$pristine" class="help-block"> Message is required.</p>

<p>
<button type="submit" ng-disabled="myform.$invalid || myform.$pending" class="btn btn-info">Submit</button>
</p>
</form>

here we’ll create a submit form named function in controller of this view to submit the information over server.

but this function will call only when our form passes all validations.

All data will binds to super object named formdata which we have used in every ng-model
by using that single object we will send data to server. it will very usefull to collect data from every fields and create a bunch. thats why we have used formdata.{field_name} in every ng-model

Now validation directives used in this form are following:

>Define form name attribute is must for validation , we have take myform as form name.

>For making a field required , we need to use required attribute
>For patter use ng-pattern , following pattern is a email syntax

ng-pattern=”/^[^\s@]+@[^\s@]+\.[^\s@]{2,}$/”

>ng-minlength is use for minimum length of input number/characters
>ng-maxlength is for maximum length of input number/characters

we have used minimum and maximum length of mobile number as per indian mobile standards
ng-minlength=”10″ ng-maxlength=”10″

Showing a message below of each field

ng-show=”{form_name}.{field_name}.$invalid && !{form_name}.{field_name}.$pristine”

for example of full_name in this form we will use >> ng-show=”myform.full_name.$invalid && !myform.full_name.$pristine”

Step 5: Now write angular controller code for form processing:

Create a module for the ng-app

var MyApp = angular.module('MyApp',[]);

Now after it define the controller method body

MyApp.controller('contactForm_CTRL', function ($scope, $http){

//form submit handler will come here

});

Now create a method which we have used in form tag ng-submit directive name ‘submit_form()’
so create a method submit_form() inside the controller as following

 
 //create a submit action on form submit//
$scope.submit_form = function()
{
	 
                  $http({
                        url: "http://localhost/web_services/add_enquiry.php",//or your add enquiry services
                        method: "POST",
                        processData: false,
						headers: {'Content-Type': 'application/x-www-form-urlencoded'},
                        data: $.param($scope.formdata) // load the formdata named super object that already binds with using ng-model
                    }).success(function(data, status, headers, config) {
                       $scope.status=data.status;
						 if($scope.status==1)
						 {
						   $scope.formdata="";
						   //Set back to pristine.
						   $scope.myform.$setPristine();
						 }
						 else
						 {
						   alert(data.message);
						 }
                         
                    }).error(function(data, status, headers, config) {
                         alert("Error in form process");
                    });
            
}

this function send your data to server and get response in json and handle the response in success callback
if all data is fine then we will save it to db in webservices and return 1 and reset the formdata and show success message that is returned by webservice in alert with following:

 $scope.formdata="";
 $scope.myform.$setPristine();//for flush all the validation errors/messages previously
 alert(data.message);

If In status ,any error then we will return status 0 and failed message also. We will show that failed message in alert as following

  alert(data.message);

Note: there is a error callback for any unexpected error from webservices that time we have alert following message:

 alert("Error in form process");

Now in your web_services/add_enquiry.php
you can use following code :

<?php
// create connection
$conn=new mysqli("localhost","root","","your_db_name");
// check connection
if (!$conn) {
    die("Connection failed: " . mysqli_connect_error());
}
if(isset($_POST) && !empty($_POST) )
{
	$full_name=$_POST['full_name'];
	$email=$_POST['email'];
	$mobile=$_POST['mobile'];
	$message=$_POST['message'];
	
	//now use there data in your insert statement like
	 
	$sql="insert into enquiry set full_name='".$full_name."', email='".$email."', mobile='".$mobile."', message='".$message."' ";
	//now execute your query
	$q = mysqli_query($conn,$sql);
	 
	if($q)
	{
		 //if query success
		 $response=array("status"=>1,"message"=>"Successfully Inserted");// data that will use to return to the angular/client app
	}
	else
	{
	  //if query fails
	   $response=array("status"=>0,"message"=>"Failed to add!");
	}
	
	//now convert the array of response into json by using 
	$return_json=json_encode($response);
	
	print $return_json; //print the json to return to client
	
	
}


mysqli_close($conn);//close connection
?>

Note: Or write your own code just like a normal post of form.

Now complete index.html code is following:

<!DOCTYPE html>
<html>
<head>
<title>Form PROCESSING & validation Angular App </title>

<script src="https://ajax.googleapis.com/ajax/libs/angularjs/1.5.8/angular.min.js"></script>
 

</head>
<body ng-app="MyApp">
<h1>Form PROCESSING & validation Angular Demo App</h1>

<div ng-controller="contactForm_CTRL">

<form name="myform" method="post" novalidate ng-submit="submit_form()"  >

<p>
<input type="text" name="full_name" ng-model="formdata.full_name" required />
</p>
<p ng-show="myform.full_name.$invalid && !myform.full_name.$pristine" style="color:red">Your Name is required.</p>

<p>
<input  ng-pattern="/^[^\s@]+@[^\s@]+\.[^\s@]{2,}$/" type="email" ng-model="formdata.email" name="email"  required />
</p>
<p ng-show="myform.email.$invalid && !myform.email.$pristine" style="color:red">Your Email is required/Invalid.</p>

<p>
  <input ng-minlength="10" ng-maxlength="10" type="number" ng-model="formdata.mobile" name="mobile"  required />
 </p>
<p ng-show="myform.mobile.$invalid && !myform.mobile.$pristine" style="color:red">Your Mobile is required/Invalid.</p>

<p>
 <textarea ng-model="formdata.message" name="message" rows="8" class="form-control" placeholder="Your message here" required></textarea>
 </p>
 <p ng-show="myform.message.$invalid && !myform.message.$pristine" class="help-block"> Message is required.</p>

<p>
<button type="submit" ng-disabled="myform.$invalid || myform.$pending" class="btn btn-info">Submit</button>
</p>
</form>
</div>

</body>
<script>
var MyApp = angular.module('MyApp',[]);

MyApp.controller('contactForm_CTRL', function ($scope, $http){
 
//create a submit action on form submit//
$scope.submit_form = function()
{
	 
                  $http({
                        url: "http://localhost/web_services/add_enquiry.php",//or your add enquiry services
                        method: "POST",
                        processData: false,
						headers: {'Content-Type': 'application/x-www-form-urlencoded'},
                        data: $.param($scope.formdata) // load the formdata named super object that already binds with using ng-model
                    }).success(function(data, status, headers, config) {
                       $scope.status=data.status;
						 if($scope.status==1)
						 {
						   $scope.formdata="";
						   $scope.myform.$setPristine();//for flush all the validation errors/messages previously
						   alert(data.message);
						 }
						 else
						 {
						  alert(data.message);
						 }
                         
                    }).error(function(data, status, headers, config) {
                         alert("Something Error in form process");
                    });
            
}
 

});
 

</script>
</html>

Comment here if you face any problem in this Thanks.


Url rewriting example in angular js

Hi Geeks,

I am sharing  Url rewriting example in angular js with complete steps to achieve it . If you are beginner with angular js then you might faced some issues with hash(#) in angular. So i am proving you the complete snippet and steps for making your url clean/pretty to make your angular js website seo friendly.

you can download full source code from here or you can follow the steps, leave comments in comment box  if you face any problem to achieve this

Step 1 . for your index.html file write following code in your htaccess file.

RewriteEngine on
# Don't rewrite files or directories
RewriteCond %{REQUEST_FILENAME} -f [OR]
RewriteCond %{REQUEST_FILENAME} -d
RewriteRule ^ - [L]
RewriteRule ^ index.html [L]

Step 2.  In index.html head section please put following lines :

<meta fragment="" content="!" />
<base href="http://localhost/angular_test/" />

Note : in base href you need to provide your project url if on local, and for server you can set it only slash (/) .

Step 3. Now according to the uri we need to load the page content , So we need to create a dynamic view and it will load the content as per the uri component :

 <div ng-view="" ></div>

Step 4: write the Routing for load different different html views as per the uri component, in index.html

So wee need to initialize and use this code for configure and defining route provider and need to enable the html5 mode to true.

Here locationprovider and routeprovider and http angular predefined directves wil be use here

define app name in body using  ng-app directive using as follow:

ng-app="MyApp"

and include the angular and routing libraries as follow :

<script src="https://ajax.googleapis.com/ajax/libs/angularjs/1.5.8/angular.min.js"></script>
<script src="https://ajax.googleapis.com/ajax/libs/angularjs/1.5.8/angular-route.js"></script>

Now we initialize and define configuration for the MyApp as follow with injecting the ngRoute Directive:

<script>

var MyApp = angular.module('MyApp', ["ngRoute"]);

MyApp.config(['$routeProvider', '$locationProvider', function ($routeProvider,$locationProvider,$http){
	$locationProvider.hashPrefix('!');	  	
	$locationProvider.html5Mode(true);
	$routeProvider

	.when('/',
	{templateUrl:'home.html'
	})
	.when('/about',
	{templateUrl:'about.html'
	})
	.when('/services',
	{templateUrl:'services.html'
	})
	.when('/not-found',
	{templateUrl:'404.html'
	})
 
	.otherwise({
	  redirectTo:'/not-found'
	});
 }]);
 

</script>

Note: I specify the url slugs and assign the template url according to the uri . you need to make each page to load the content as per the url.

You have sucessfully done the url rewriting in angular js . Now full code of your index.html

<!DOCTYPE html>
<html>
<head>
<title>My SEO Friendly ANGULAR APP </title>
<meta fragment="" content="!" />
<base href="http://localhost/angular_test/" />
<script src="https://ajax.googleapis.com/ajax/libs/angularjs/1.5.8/angular.min.js"></script>
  <script src="https://ajax.googleapis.com/ajax/libs/angularjs/1.5.8/angular-route.js"></script>
</head>
<body ng-app="MyApp">
<h1>MY ANGULAR SEO REWRITING DEMO APP</h1>
<p><a href="./">Home</a> &nbsp;&nbsp;<a href="about">About</a> &nbsp;&nbsp;<a href="services">Services</a> &nbsp;&nbsp;</p>
 <div ng-view="" ></div>
</body>
<script>
var MyApp = angular.module('MyApp', ["ngRoute"]);
MyApp.config(['$routeProvider', '$locationProvider', function ($routeProvider,$locationProvider,$http){
	$locationProvider.hashPrefix('!');	  	
	$locationProvider.html5Mode(true);
	$routeProvider

	.when('/',
	{templateUrl:'home.html'
	})
	.when('/about',
	{templateUrl:'about.html'
	})
	.when('/services',
	{templateUrl:'services.html'
	})
	.when('/not-found',
	{templateUrl:'404.html'
	})
 
	.otherwise({
	  redirectTo:'/not-found'
	});
 }]);
 

</script>
</html>

Download full source code here


Codeigniter best tricks and hacks

Hi Friends,
Today I am sharing you some best tricks i have used in couple of projects, may be these things are common but we need these in all of our projects and we can find it on google but by different different authors, i am providing all the codeigniter tips tricks and hacks in this single article. if i missed any other trick then please let me know through comments, I will update it to my article.

Now please find the

Codeigniter best tricks and hacks

1: Remove index.php from url codeigniter

Solution : we need to update the .htaccess with following code:

RewriteEngine on
#RewriteBase /
RewriteRule ^(application|system|\.svn) index.php/$1 [L]
RewriteCond %{REQUEST_FILENAME} !-f
RewriteCond %{REQUEST_FILENAME} !-d
RewriteRule ^(.*)$ index.php?/$1 [QSA,L]
#RewriteRule ^(.*)$ index.php?/$1 [L]

2: Call Controller function or varriable from view

Solution : We need to pass the controller self object to its view to call the function or varriable of that controller . please follow instructions:

/*
controller code here
....
....
..my function 1 
..my function 2
{
  //returning any calculation 
}
*/
//Now in function 1 we are loading view 1
//and we want to call the function 2 after loaded the //view 1
//in controller file assign a self object to view
$this->data['items']=$data_from_database;
$this->data['controller']=$this;
$this->load->view('view1',$this->data);
-------------------------------------------------------------
//now in view1.php
you can call the function 2 directly as
$get_rates=$controller->function2();
//user the rate in running view

3: Db prefix in core queries

Solution : in database.php we need to pass swap_pre in configuration index in db config array. please see example:
In database.php there is a config array start with following:

$db['default'] = array(
	'dsn'	=> '',
	'hostname' => 'localhost',
        .....
	.....

So in this list there is a index named db_prefix
this is general usage in CI auto qyuiry builder class
but if we are writing the core queries then we need to pass any string like:

'swap_pre' => '{pre}',

now we can use the swap_pre value appending before table name in our query as following:

$result = $this->db->query("SELECT  * FROM {pre}records WHERE record_id ='34' and category NOT IN (78,65,98)  GROUP BY create_date");
 return $result ->result_array();

4: Call model and its function from library and helpers

Solution : we can load any model from helper or library by instantiating the ci global object using call by refrence as following:

//create a object in helper or library in codeigniter
$this->CI = &get_instance();

//now if we want to load any model then
$this->CI->load->model('Home_model');
//or load library using
$this->CI->load->library('Pdf_custom_library');

5: Get rendered html of your view in a Controller’s varriable

Solution : Use third parameter as true in this load view

Eg:

$mydata_to_view=array(“bla”=>”bla bla value”);
$myEmail_html=$this->load->view(“my_email_template”, $mydata_to_view,true);
//Now this statement will not print output instead of it will return the html string.

check value already exists in codeigniter

Callback function of codeigniter which checks whether the value already exists in particular column of table or not.

This function work on add and edit both cases,it return false if value exists and return true if value not exists.

following is the function that you need to put in your controller file:

public function check_exist($string,$token){
      if(!empty($string)){
		$token=explode("-",$token);
		$column=$token[1];
		if($token[0]=="add")
		{
			 $where = array(
				  $column => $string
				);
		}
		if($token[0]=="edit")
		{
			 $where = array(
				  $column => $string,
				  'id!=' => $token[2]
				);
		}
		
		
        $this->db->select('id');
		$this->db->from('table_name');
		$this->db->where($where);
		$num_results = $this->db->count_all_results();
		

        if($num_results>0){
          $this->form_validation->set_message('check_exist', 'The %s value is already exists.');
          return false;
        }else{
          return true;
        }
      }
    }

Note: change the table name in function and in edit case you can change the primary key!= with your table’s key name.

Now time to using this callback function for adding and editing forms.We need to pass the callback function in validation rules.

For the time of adding you can pass the rule in your add action like as:

array(
                 'field'   => 'cat_title',
                 'label'   => 'Category Title',
                 'rules'   => 'trim|required|callback_check_exist[add-cat_name]'
              ),
		
or 
	  
	$config = array
            (
            array(
                 'field'   => 'cat_title',
                 'label'   => 'Category Title',
                 'rules'   => 'trim|required|callback_check_exist[add-cat_name]'
              ),
			array(
                 'field'   => 'slug',
                 'label'   => 'Category Slug',
                 'rules'   => 'trim|required|callback_check_exist[add-slug]'
              ),
			array(
                 'field'   => 'description',
                 'label'   => 'Category Description',
                 'rules'   => 'trim|required'
              ),
			array(
                 'field'   => 'parent_id',
                 'label'   => 'Parent Category',
                 'rules'   => 'trim'
              ),
        );
        
        $this->form_validation->set_rules($config);

and in your edit action you can use the rule as following:

array(
 'field' => 'cat_title',
 'label' => 'Category Title',
 'rules' => 'trim|required|callback_check_exist[edit-cat_name-'.$cat_id.']'
 ),
 OR
 $config = array
 (
 array(
 'field' => 'cat_title',
 'label' => 'Category Title',
 'rules' => 'trim|required|callback_check_exist[edit-cat_name-'.$cat_id.']'
 ),
 array(
 'field' => 'slug',
 'label' => 'Category Slug',
 'rules' => 'trim|required|callback_check_exist[edit-slug-'.$cat_id.']'
 
 ),
 array(
 'field' => 'description',
 'label' => 'Category Description',
 'rules' => 'trim|required'
 ),
 array(
 'field' => 'parent_id',
 'label' => 'Parent Category',
 'rules' => 'trim'
 ),
 );
 
 
 $this->form_validation->set_rules($config);
 

Thanks for reading full article , Now use it in your project and if you face any trouble then comment here.

CREATE OWN CAPTCHA FOR YOUR WEBSITE

Hi Geeks,
I am sharing you a program for creating a captcha script using php and javascript. Following are the simple steps to create captcha in php

Step 1: Create a php script named ‘captcha.php’ with following code that generate and return a captcha image.

<?php session_start();
if(isset($_SESSION['custom_captcha']))
{
unset($_SESSION['custom_captcha']); // destroy the session if already there
}
$string1="abcdefghijklmnopqrstuvwxyz";
$string2="1234567890";
$string=$string1.$string2;
$string= str_shuffle($string);
$random_text= substr($string,0,8); // change the number to change number of chars
$_SESSION['custom_captcha']=$random_text;
$im = @ImageCreate (80, 20)
or die ("Cannot Initialize new GD image stream");
$background_color = ImageColorAllocate ($im, 204, 204, 204); // Assign background color
$text_color = ImageColorAllocate ($im, 51, 51, 255); // text color is given 
ImageString($im,5,5,2,$_SESSION['custom_captcha'],$text_color); // Random string from session added 
ImagePng ($im); // image displayed
imagedestroy($im); // Memory allocation for the image is removed. 
?>

Step 2: Now create a captcha.js file and put following code in the file.

function reload()
{
img = document.getElementById("capt");
img.src="captcha.php";
}

$(document).ready(function(){

var htm='<p><img src="captcha.php" id="capt">&nbsp;<input width="30" height="30" type="image" src="reload.png" onClick="reload();"  ></p><p><input type="text" name="g-recaptcha-response"  > ';

$('#custom_captcha').html(htm);//set the captcha data in element having id > custom_captcha . you can change as your div/Element id


});

Step 3: Now we need to create a Placeholder Element inside the form as following:

<!--inside the form tag-->
<!--this custom_captcha id is used in js file,you can change in js and html both-->
<div id="custom_captcha"></div>
<!--inside the form tag-->

Step 4: Now after submitting you from validate the captcha was right or not. So in your form submit action use following code.

<?php

if(!isset($_REQUEST['g-recaptcha-response']) || empty($_POST['g-recaptcha-response']) )
{
	
	$error = "Please fill the captcha.";
	//you can use this error var later to show error message on your page
}
else
{
 	
 
	$cresponse = urlencode($_REQUEST['g-recaptcha-response']);
 
	if($cresponse!=$_SESSION['custom_captcha'])
	{
	 $error = "INVALID CAPTCHA";
	 //you can use this var to show error invalid captcha
	}
	
}

//Now if no error then do your further process//
if($errors=="")
{
  //go ahed with form submission or data manipulation
}

?>

Note 1: In which page/form you are using the capcha , there should be session start in top of the file as following:

<?php @session_start(); ?>

and also include the js file in your php page head section. jquery should be available before the captcha.js inclusion as following:

<script src="https://ajax.googleapis.com/ajax/libs/jquery/1.12.4/jquery.min.js"></script>
<script src='captcha.js'></script>

Note 2: PHP GD LIBRARY SHOULD BE INSTALLED ON YOUR SERVER.


Pagination code using php and mysql

Hi Geeks,
We have gone through some user requests for pagination code for php mysql project.So we have created a simple class where you can easily create pagination for any grid or listing. following are the simple steps for making a pagination system in php.

Step 1: Create a class file ‘Paginator.class.php’ in your project with following code snippet

<?php
 
class Paginator {
 
     private $_conn;
        private $_limit;
        private $_page;
        private $_query;
        private $_total;
		
	 public function __construct( $conn, $query ) {
		 
		$this->_conn = $conn;
		$this->_query = $query;
	 
		$rs= $this->_conn->query( $this->_query );
		$this->_total = $rs->num_rows;
		 
	}
	public function getData( $limit = 10, $page = 1 ) {
     
    $this->_limit   = $limit;
    $this->_page    = $page;
   
 
    if ( $this->_limit == 'all' ) {
        $query      = $this->_query;
    } else {
		$offset=( ( $this->_page - 1 ) * $this->_limit );
        $query      = $this->_query . " LIMIT " . $offset . ", $this->_limit";
    }
    $rs             = $this->_conn->query( $query );
	 
   $results=array();
    while ( $row = $rs->fetch_assoc() ) {
        $results[]  = $row;
    }
 
    $result         = new stdClass();
    $result->page   = $this->_page;
    $result->limit  = $this->_limit;
    $result->total  = $this->_total;
    $result->data   = $results;
 
    return $result;
	}
	
	public function append_existing_query_string($qstring)
	{
		if(isset($_GET))
		{
			foreach($_GET as $k=>$v)
			{
				$qstring.="&".$k."=".$v;
			}
		}
		return $qstring;
	}
	
	public function createLinks( $links, $list_class ) {
    if ( $this->_limit == 'all' ) {
        return '';
    }
 
    $last       = ceil( $this->_total / $this->_limit );
 
    $start      = ( ( $this->_page - $links ) > 0 ) ? $this->_page - $links : 1;
    $end        = ( ( $this->_page + $links ) < $last ) ? $this->_page + $links : $last;
 
    $html       = '<ul class="' . $list_class . '">';
 
    $class      = ( $this->_page == 1 ) ? "disabled" : "";
	    
	//
	$qstring='?limit=' . $this->_limit . '&page=' . ( $this->_page - 1 );
	$qstring=$this->append_existing_query_string($qstring);
	//
	
    $html       .= '<li class="' . $class . '"><a href="'.$qstring.'">&laquo;</a></li>';
 
    if ( $start > 1 ) {
		
		//
		$qstring='?limit=' . $this->_limit . '&page=1';
		$qstring=$this->append_existing_query_string($qstring);
		//
        $html   .= '<li><a href="'.$qstring.'">1</a></li>';
        $html   .= '<li class="disabled"><span>...</span></li>';
    }
 
    for ( $i = $start ; $i <= $end; $i++ ) {
        $class  = ( $this->_page == $i ) ? "active" : "";
		//
		$qstring='?limit=' . $this->_limit . '&page=' . $i;
		$qstring=$this->append_existing_query_string($qstring);
		//
        $html   .= '<li class="' . $class . '"><a href="'.$qstring.'">' . $i . '</a></li>';
    }
 
    if ( $end < $last ) {
        $html   .= '<li class="disabled"><span>...</span></li>';
		//
		$qstring='?limit=' . $this->_limit . '&page=' . $last;
		$qstring=$this->append_existing_query_string($qstring);
		//
        $html   .= '<li><a href="'.$qstring.'">' . $last . '</a></li>';
    }
 
    $class      = ( $this->_page == $last ) ? "disabled" : "";
	
	$qstring='?limit=' . $this->_limit . '&page=' . ( $this->_page + 1 );
	$qstring=$this->append_existing_query_string($qstring);
	
    $html       .= '<li class="' . $class . '"><a href="'.$qstring.'">&raquo;</a></li>';
 
    $html       .= '</ul><span style="float:right;color:blue">Total records : '.$this->_total.'</span>';
 
    return $html;
	}

}
?>

Step 2: Include the paging class before extracting data to show

<?php

include 'Paginator.class.php';

?>

Step 3: Now extract the data for any page as following

<?php
//create a connection to mysql
	$conn       = new mysqli('SERVER HOST NAME','MYSQL USER NAME', 'MY SQL USER PASSWORD','PROJECT DATABASE NAME' );
	
	//DEFINE LIMIT for PER PAGE now 25 is page limit
    $limit      = ( isset( $_GET['limit'] ) ) ? $_GET['limit'] : 25;
	
	//DEFAULT PAGE NUMBER if No page in url
    $page       = ( isset( $_GET['page'] ) ) ? $_GET['page'] : 1;
	
	//Number of frequency links to show at one time ; 
    $links      = ( isset( $_GET['links'] ) ) ? $_GET['links'] : 7;
   
   //your query here in query varriable
    $query  = "Select * from customers  ";
 
 //create a paging class object with connection and query parameters
    $Paginator  = new Paginator( $conn, $query );
 
 //get the results from paginator class
    $results    = $Paginator->getData( $limit, $page ); 
 ?>

Step 4 : Now we are ready with data. So just showing the data and links as following

> Show the data first and after it showing the pagination links as following:

<table class="table table-striped">
              <thead>
                <tr>
               
                  <th>Customer Id</th>
                  <th>Customer Name</th>
				  <th>Customer Email</th>
                  <th>Customer Address</th>
                 
                </tr>
              </thead>
              <tbody>
				<?php
			 
				if(isset($results) && count( $results->data ) > 0){
				 
				 for( $i = 0; $i < count( $results->data ); $i++ ) { ?>
				<tr>
                <td><?php echo $results->data[$i]['id']; ?></td>
                <td><?php echo $results->data[$i]['name']; ?></td>
                <td><?php echo $results->data[$i]['email']; ?></td>
                <td><?php echo $results->data[$i]['address']; ?></td>
               
				  
				</tr>
				<?php }
				} ?>
               
              </tbody>
            </table>

> Show the paging links after the data

<p><?php echo $Paginator->createLinks( $links, $class="pagination"); ?></p>