How to Create a custom PopUp Component in React

In this blog we will learn how to create a custom PopUp Component in React. Our Focus will be on creating a Reusable Component that we can Invoke from any of the component entire our project.

So Let’s follow the steps to create this component.

Step 1: Create a file named custom-popup.module.css with following code

In this file we have created all the relevant css that will be needed in our component

Step 2: Now create Popup Component with name CustomPopup.jsx with following code

This will be our component code where we are maintaining the popup opening and closing states on various events. Also we are using propTypes Module to validate our Props. make sure you have installed prop-types module using following npm command

Step 3: Invocation from another component
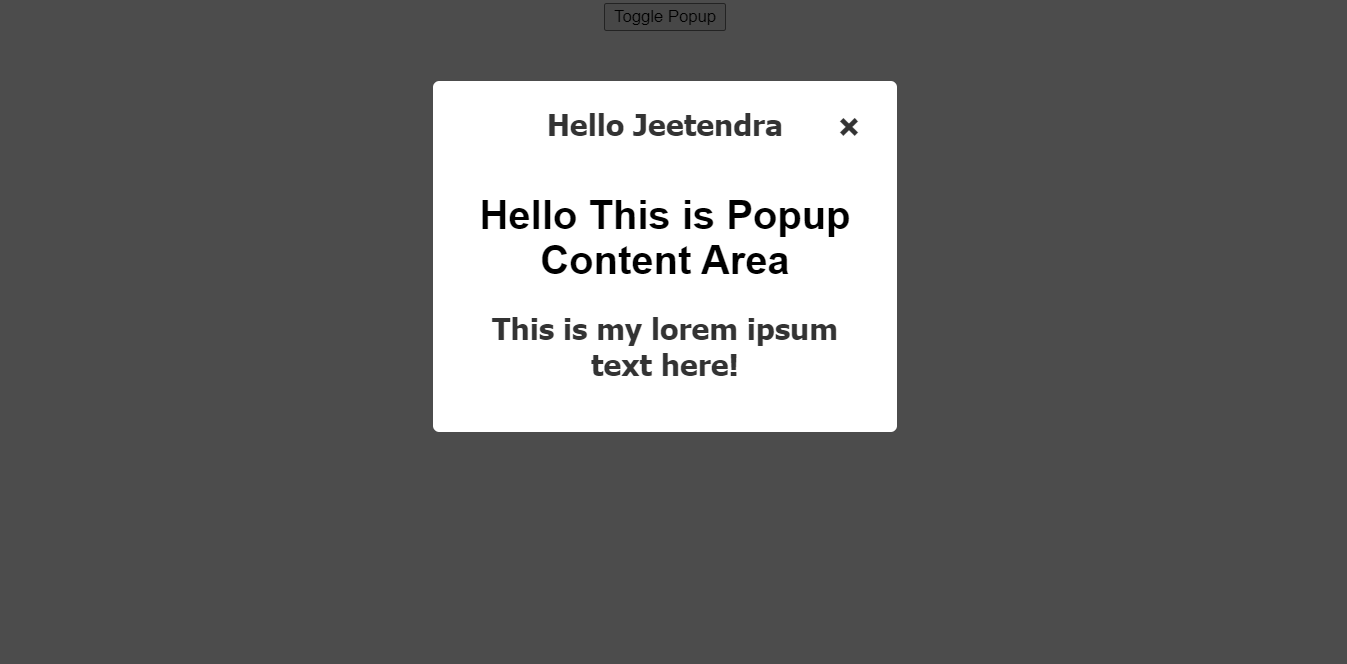
It will need 3 props :
1: onClose – need a handler to do some activity after close click in popup itself
2: show – pass the visibility of popup suing boolean true or false
3: title – provide the popup title


and Inside the you may pass any valid JSX that you want to render as content of popup

If you need a complete example how can we do utilise this PopUp Component then you may look into following code

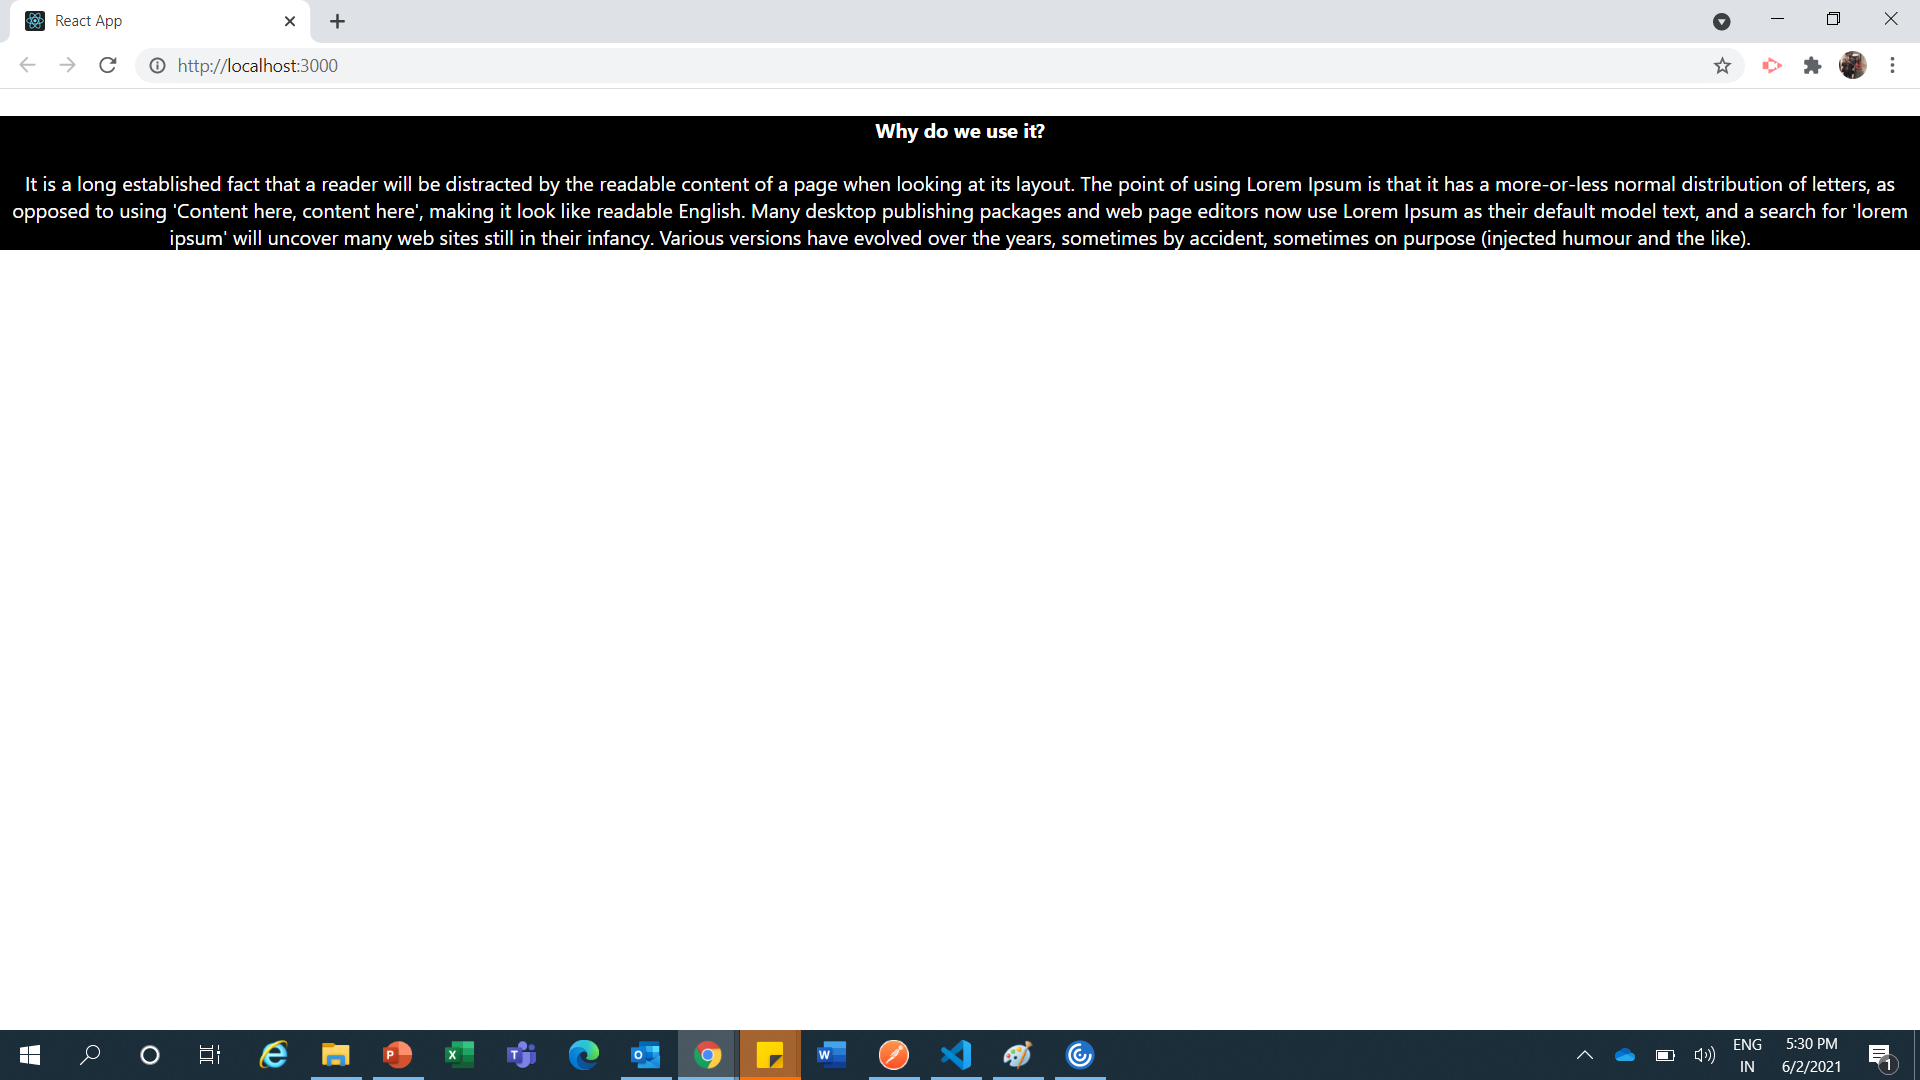
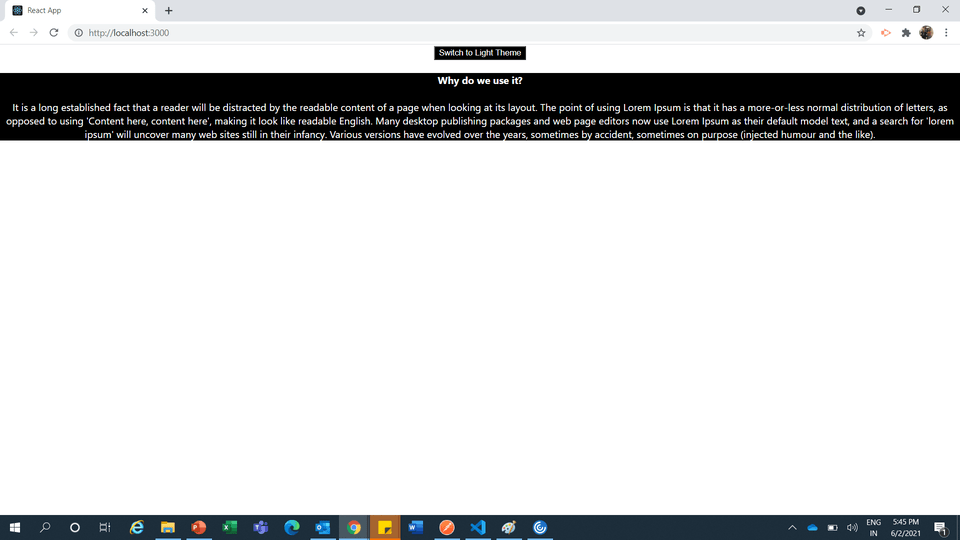
Hurray we are all set, It will look like following screenshot

react custom popup component


Thats it for this blog. you may reach out to me in case you have any doubts and suggestions please let me know in comments section.

Thanks

Understand Nested Routing in React – React Routing Part-2

In this blog we will understand Nested Routing in React. First we will discuss the Nested routing and its use cases.

Also Guys if you haven’t read Routing in React – Part 1 then click Here as this Blog is part 2 of that blog.


Suppose we have a Blog Page where all blogs will be listed and if user clicked on any blog link the its details page needs to open under blog
as parent slug with its title.

for Example, Blog Page Url is : http://localhost/blog

is will list all of the blog titles like this :

Tutorial 1
or
Tutorial 2

and if we click on these titles then url would be like this :

http://localhost/blog/tutorial-1
or
http://localhost/blog/tutorial-2

and these url are basically nested urls as both of them comes under /blog scheme so this kind of scenarios can be handled via nested routing.

So let’s get started :

In our Exiting App.jsx, Add a menu for Blog after Home menu :

Note: Here the menuData was already presented (in previous Routing Blog), We have just added Blog after Home.

here we have added 1 more menu named Blog after Home

Create a Route for Blog In Exiting Switch

Note : as of now we dont have Blog component so we will create it in next step.

Now Create a Blog Component named Blog.js which uses Nested Routing in React :

In above code we are using useRouteMatch to read the current matched url means it is reading till /blog of the url that is current route and we have create 1 new switch with following route :

So its means if we get any other slug after current slug (/blog), then that should load the component Detail(this component we will create in next step.)

So basically we have created a nested route in blog route in Blog Component itself.

Now lets create a Detail Component named Detail.js like this :

In this component we are using useParams() hook to read the available parameters in url, and we are reading slug and finding in our data with that slug and showing the relevant details.

let see how our application looks like now :

Hope you understand the routing to download the full source code please click here.

If you face any issues then let me know in comments section. also suggestions are most welcome.

Create a Simple App to Understand Routing in React

In this blog we will create a simple application to understand Routing in React. So basically here we will use a package react-router-dom to implement routing in our application.

This App will be able to load relevant component on a particular url routing, Also we will create a dynamic Page Component that will handle Dynamic Page Routing as well.

I am assuming you have already created a React App, Now lets Start the Routing implementation Step by Step :

Step 1: Install React router dom

Step 2 : We will create a component to show navigation in top of our App, So Create Header.js file with following code :

If you have notices we have Imported and used Component from React Router Dom, So If React Routing We should not use <a> anchor tags, as it reloads the whole page again and In any client side application this is not recommended. tag itself render same as anchor except it doesn’t reload the whole page.

This component will basically will be used to display header menus. also we can see that we are running loop over props.menus, so it means that we will need to pass menus wherever we call this Header component.

Now lets add some css in your already existing css file App.css :

Step 3 : Create a Home Component named Home.js that will show our Home page on our root url :

Above is simple a Component that renders 1 title and description.

Step 4: Create a dynamic page named Page.js that will handle dynamic pages according to url parameters :

Understand Dynamic Page Component

In this Component we are using a Hook named useParams(), this is a function that we have imported from react-router-dom itself that just reads the parameter passed in url for specific route. and behalf of this parameter we are find and showing from our static data for multiple pages. in real scenario this data may come from api as well.

Step 5: Now lets work on App.js to configure the Routes, Lets update the App.js code as following :

Understanding App.js Code In Detail

In this code initially we have imported these 3 components like this :

First Component is Browser Router that we have aliased as Router, this will be our Root Component of routing implementation So we will wrap the whole routing related stuff in this Component

Second Component is Route that will use for defining the url Route and where(On which Component) that Route will land

Third Component is Switch that will be a Wrapper required on All Routes to decide which route is matched with url

Also you can see we have created a menuData and passed this as menus property of Header component, So In Header component we have already handled the menus from props and print it accordingly

Now lets understand the Switch in our Jsx :

In this switch, First Routes is dynamic url and defined as /page/:slug where slug is variable name, can captured in Page Component using useParams() hook. and In this Route component, we have passed Component so it means when this route matches then Load the Page Component.

Second Route is straigt forward for handle Root Url and It will Land on Home component as defined.

let see how its Looks in action :

Thats it folks, If you face any trouble in setup this demo let me know in comments Section. I will be happy to help you. Suggestions are also Welcome.

To download the Source Code Click Here.

Checkout Part 2 of this blog where we have discussed about Nested Routing.

Simple Component for Multilevel Sidebar Menus in React

In this blog we will create a simple component for Multilevel sidebar menus in React. This will a reusable component that will receive data as props and render the sidebar navigation menus which supports N level of depth.

My Assumption is you are familiar with React Router Dom and its usage as I am using React Router Dom for Routing purpose in this application.

So let’s get Started :

Step 1: Create a Css File names MultilevelSideNav.css and put following code :

Step 2: Create a Side Nav Component named MultilevelSideNav.js with following code :

Now we will create 2 components for url handleing 1 for Showing Home page and another for showing
Page relevant information.

Step 3: Create a simple Home Component Home.js Like this:

Step 4: Create a Page Component Page.js that will show a menu Title by its Slug :

Now we are ready to Call our MultilevelSideNav Component that we have created in Step 2

Step 5: lets do the changes in App.js to call MultilevelSideNav Component :

Constructing the menu data, you may grab this data from your api as well

and Finally this will be our JSX return in App.js

Note : As I mentioned earlier as well I am using React Router Dom to handle page click and showing relevant page information once landing to any page

And Finally lets see how our App will look this :

Thats it we have created our multilevel sidebar menus in react js. if you face any issue in creating this component on your system please let me know in comments section. Also Suggestions or Feedbacks for improvement are welcome.

You may Download the complete source code by clicking this link

Simple Component for Multilevel Navigation Menus in React

In this Blog we will create a simple application for Multilevel Navigation Menus in React Js which accepts data through props and display Nth Level Navigation Menus.
Assuming you have already using react-router-dom as we are using that to handle the Routing and Navigation Links in this demo.

So let’s get started :

Step 1: Create a MultilevelMenu.css file and put following css code :

Step 2: Create a Component Named MultilevelMenu.js with following code :

Now your Component is ready but if we click on any menu/url that there should be 2 component, 1 for Home page and 1 for other pages as per url slug passed.

Step 3: Create a simple Home Component Home.js Like this:

Step 4: Create a Page Component Page.js that will show a menu Title by its Slug using following code :

Now we are ready to Call our Multilevel menu Component

Step 5: In this Step we’ll do the changes in App.js File

First add the dummy menus data, you may get similar structure data from api as well if needed.

Now we have the data ready, Next we need to do modify our JSX return Statement like this:

Note : As we have mentioned we are using React Router Dom to handle click on various menus, Home page will show the Home component and All other multi level menus will land on Page component so that all pages can land and show page menu somewhere and we can see the menus in Action

Lets See How finally our App looks Like :

Hope This is Something Helpful to you, In case any suggestions or difficulties please let me know in comments.

TO DOWNLOAD THE WHOLE CODE CLICK ON THIS LINK

React Context Api with Hooks to make Stateful Application

This blog is focused about to create a Stateful Application using React Context Api with Hooks. In this App we will Create a stateful app without using redux or any other third party library.

React Context Api used to share data in React component Tree. So we create Global State or Object to share the Data among Nth level of child and siblings under one root.

In This App we will create a theme changing demo where default theme will be passed from Our Top level Component and child component will be able to use that info. Also from child component we will be able to
update that top level theme data and immediately the update theme will reflect in subsequent child
components.

So lets get Started with following Steps to create a Stateful App using React Context Api with Hooks :

Step 1 : Creating a new React App using CRA, you may skip this if you already having React App setup.
To simply create & run a app named react-context-demo just use following statement in any your CLI

Now you have started the React App and it will look like this :

Step 2: Create a file named AppContext.js using following code :

Step 3: Go to App.js file and replace all code with following code :

Now you have App component in that we will import the provider from our created Context like this

now create a State for default theme like this :

Now wrap the Div ClassName App using Provider like this :

To use this default theme data we need to create 2 components, so we are creating 1 component to preview the theme and 1 component to update the theme

Step 4: Create a child component (Child.js) that uses the theme data and simply show a message with following code :

Now we need to call this component from App component, so returned jsx will look like this :

Lets see how the child component looks now after using the default theme :

Now there is 1 more Step that is required if we want to change the Theme Data/Global Data from any child component, so for that we will make another Toggle component.

Step 5 : Create a Toggle Component to change theme data to override Context Provider’s Default data Make a file named Toggle.Js and use following code in that :

Now Use this toggle component in App.js before/After the Child Component, We are calling it before so that it will look on top of child component like this :

Let see in Action How its looking.

Now we can see if we click on toggle button then we can easily switch the theme and that theme is also applying on child component immediately.

You may Download the complete source code by clicking this link. Please let me know your thoughts and improvement Ideas over this. Also if you face any kind of difficulties to run or understand that. Please let me know in comments section.

You may Download the complete source code by clicking this link

How to create dynamic fields in React Component

Hey Friends,
In this tutorial we’ll know that how we can create dynamic fields in react js. I hope you are aware with the Installation and setup the React application using CRA utility provided by react.
I am assuming that you have already setup a react project. So lets get start it.

create a file named DynamicForm.jsx and add following basic class syntax in it.

Now add some initial state in constructor.

Loop through the initial data in render method

Noticed we have used handleChange & handleDelete method in above jsx, so lets create those methods as well

Now will need Add new row button and save form button, so let them create before the dynamic form fields are rendering

Now above buttons handlers to handle new row and save the updated/filled form data to api/server.

Now All code at one shot

Now just Import and Add this component where you want we have called it in App Component like this, putting my App.js code

Note : I have used classes from bootstrap css framework, if you haven’t implemented the bootstrap in your project then you may edit
index.html from public folder and add following bootstrap css cdn link to look this demo fine.

put this in head section

This is all I have for this blog, if you have any queries then let me know me via contact us form or do comments below. Also the live
demo for this code is available at https://codesandbox.io/s/dynamic-form-fields-in-react-y6p3e?file=/src/DynamicForm.jsx