

In this blog we will create a simple application to understand Routing in React. So basically here we will use a package react-router-dom to implement routing in our application.
This App will be able to load relevant component on a particular url routing, Also we will create a dynamic Page Component that will handle Dynamic Page Routing as well.
I am assuming you have already created a React App, Now lets Start the Routing implementation Step by Step :
Step 1: Install React router dom
|
1 |
npm install react-router-dom --save |
Step 2 : We will create a component to show navigation in top of our App, So Create Header.js file with following code :
|
1 2 3 4 5 6 7 8 9 10 11 |
import { Link } from "react-router-dom"; const Header = props => { return ( <div className="headerNav"> {props?.menus && props.menus.map( (m,index)=>( <div className="menuItem" key={index}><Link to={m.url} >{m.title}</Link></div> ))} </div> ) } export default Header; |
If you have notices we have Imported and used Component from React Router Dom, So If React Routing We should not use <a> anchor tags, as it reloads the whole page again and In any client side application this is not recommended. tag itself render same as anchor except it doesn’t reload the whole page.
This component will basically will be used to display header menus. also we can see that we are running loop over props.menus, so it means that we will need to pass menus wherever we call this Header component.
Now lets add some css in your already existing css file App.css :
|
1 2 3 4 5 6 7 8 9 10 11 12 13 14 15 16 |
.headerNav{ background-color:#000;; color:#fff; width:100%; height:25px; padding:10px } .menuItem{ display:inline; padding:10px } .menuItem a{ color:#fff; text-decoration: none; cursor:pointer; } |
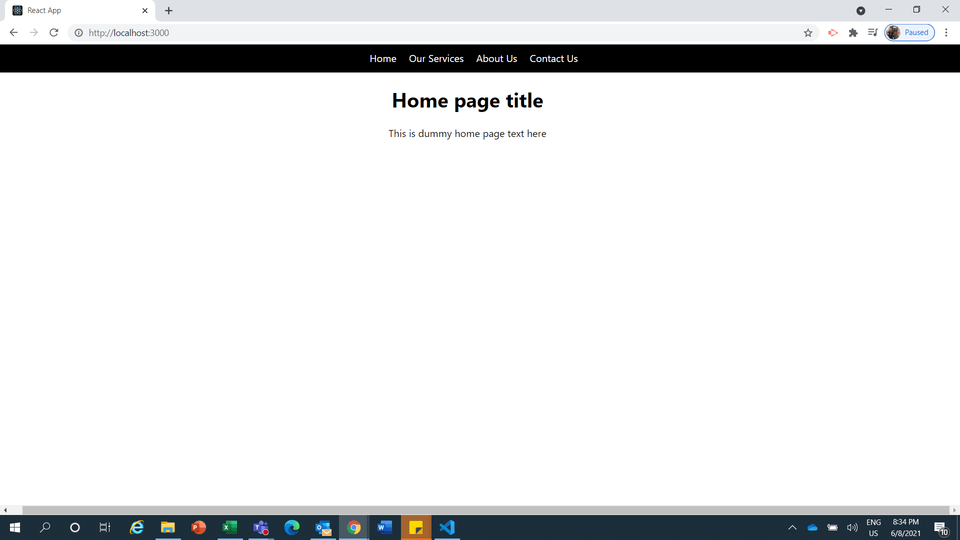
Step 3 : Create a Home Component named Home.js that will show our Home page on our root url :
|
1 2 3 4 5 6 7 8 9 10 11 |
const Home = () => { return ( <div> <h1>Home page title</h1> <div> This is dummy home page text here </div> </div> ) } export default Home; |
Above is simple a Component that renders 1 title and description.
Step 4: Create a dynamic page named Page.js that will handle dynamic pages according to url parameters :
|
1 2 3 4 5 6 7 8 9 10 11 12 13 14 15 16 17 18 19 20 21 22 23 24 25 26 |
import { useParams } from "react-router-dom"; const Page = () => { const staticData=[ { slug:'services', title:'Our Services', description:'This is our services page description' }, { slug:'about', title:'About Us', description:'This is about us page description' } ] const {slug} = useParams(); const pageData = staticData.find(r=>r.slug===slug) return ( <div> <h1>{pageData.title}</h1> <div> {pageData.description} </div> </div> ) } export default Page; |
Understand Dynamic Page Component
In this Component we are using a Hook named useParams(), this is a function that we have imported from react-router-dom itself that just reads the parameter passed in url for specific route. and behalf of this parameter we are find and showing from our static data for multiple pages. in real scenario this data may come from api as well.
Step 5: Now lets work on App.js to configure the Routes, Lets update the App.js code as following :
|
1 2 3 4 5 6 7 8 9 10 11 12 13 14 15 16 17 18 19 20 21 22 23 24 25 26 27 28 29 30 31 32 33 34 35 36 37 38 39 40 41 42 43 |
import React from 'react'; import { BrowserRouter as Router, Route, Switch } from 'react-router-dom'; import './App.css'; import Header from './Header'; import Home from './Home'; import Page from './Page'; const App = () => { const menuData = [ { title: "Home", url: "/" }, { title: "Our Services", url: "/page/services" }, { title: "About Us", url: "/page/about" }, { title: "Contact Us", url: "/page/contact" } ] return ( <div className="App"> <Router> <Header menus={menuData} /> <Switch> <Route path="/page/:slug"> <Page /> </Route> <Route path="/"> <Home /> </Route> </Switch> </Router> </div> ); } export default App; |
Understanding App.js Code In Detail
In this code initially we have imported these 3 components like this :
|
1 |
import { BrowserRouter as Router, Route, Switch } from 'react-router-dom'; |
First Component is Browser Router that we have aliased as Router, this will be our Root Component of routing implementation So we will wrap the whole routing related stuff in this Component
Second Component is Route that will use for defining the url Route and where(On which Component) that Route will land
Third Component is Switch that will be a Wrapper required on All Routes to decide which route is matched with url
Also you can see we have created a menuData and passed this as menus property of Header component, So In Header component we have already handled the menus from props and print it accordingly
Now lets understand the Switch in our Jsx :
|
1 2 3 4 5 6 7 8 |
<Switch> <Route path="/page/:slug"> <Page /> </Route> <Route path="/"> <Home /> </Route> </Switch> |
In this switch, First Routes is dynamic url and defined as /page/:slug where slug is variable name, can captured in Page Component using useParams() hook. and In this Route component, we have passed Component so it means when this route matches then Load the Page Component.
Second Route is straigt forward for handle Root Url and It will Land on Home component as defined.
let see how its Looks in action :
Thats it folks, If you face any trouble in setup this demo let me know in comments Section. I will be happy to help you. Suggestions are also Welcome.
To download the Source Code Click Here.
Checkout Part 2 of this blog where we have discussed about Nested Routing.