How to make a news aggregator website

Hi Geeks,
I am Sharing you the code for reading a rss feed using php script.
Following are the Steps to make a news aggregator website using rss reader in php
Step 1: Create a form having Rss Urls in select box as following

<p><b>Choose category :</b>
<form method="post" id="myform"  >
<select required name="rssurl">
<option value="">Select</option>
<option value="http://timesofindia.feedsportal.com/c/33039/f/533916/index.rss">India News</option>
<option value="http://timesofindia.feedsportal.com/c/33039/f/533917/index.rss">World News</option>
<option value="http://timesofindia.feedsportal.com/c/33039/f/533922/index.rss">Science News</option>
</select>
<input type="submit" value="Load" />
</form>
</p>

Step 2. Php code to recieve the submitted post and rss url. and get the rss output in object and parse the feed or rss using the dom document class and accessing the properties as following:

<?php

if(isset($_POST['rssurl']))
{
	echo '<h1>Search Result for rss url:'.$_POST['rssurl'].'</h1>';
	$rssurl=$_POST['rssurl'];
	$rss = new DOMDocument();
	$rss->load($rssurl);
	$feed = array();
	foreach ($rss->getElementsByTagName('item') as $node) {
		$item = array ( 
			'title' => $node->getElementsByTagName('title')->item(0)->nodeValue,
			'desc' => $node->getElementsByTagName('description')->item(0)->nodeValue,
			'link' => $node->getElementsByTagName('link')->item(0)->nodeValue,
			'date' => $node->getElementsByTagName('pubDate')->item(0)->nodeValue,
			);
		array_push($feed, $item);
	}
	$limit = 5;
	for($x=0;$x<$limit;$x++) {
		$title = str_replace(' & ', ' &amp; ', $feed[$x]['title']);
		$link = $feed[$x]['link'];
		$description = $feed[$x]['desc'];
		$date = date('l F d, Y', strtotime($feed[$x]['date']));
		echo '<p><strong><a href="'.$link.'" title="'.$title.'">'.$title.'</a></strong><br />';
		echo '<small><em>Posted on '.$date.'</em></small></p>';
		echo '<p>'.$description.'</p>';
	}
}
?>

Final Complete Code:

<p><b>Choose category :</b>
<form method="post" id="myform"  >
<select required name="rssurl">
<option value="">Select</option>
<option value="http://timesofindia.feedsportal.com/c/33039/f/533916/index.rss">India News</option>
<option value="http://timesofindia.feedsportal.com/c/33039/f/533917/index.rss">World News</option>
<option value="http://timesofindia.feedsportal.com/c/33039/f/533922/index.rss">Science News</option>
</select>
<input type="submit" value="Load" />
</form>
</p>
<?php

if(isset($_POST['rssurl']))
{
	echo '<h1>Search Result for rss url:'.$_POST['rssurl'].'</h1>';
	$rssurl=$_POST['rssurl'];
	$rss = new DOMDocument();
	$rss->load($rssurl);
	$feed = array();
	foreach ($rss->getElementsByTagName('item') as $node) {
		$item = array ( 
			'title' => $node->getElementsByTagName('title')->item(0)->nodeValue,
			'desc' => $node->getElementsByTagName('description')->item(0)->nodeValue,
			'link' => $node->getElementsByTagName('link')->item(0)->nodeValue,
			'date' => $node->getElementsByTagName('pubDate')->item(0)->nodeValue,
			);
		array_push($feed, $item);
	}
	$limit = 5;
	for($x=0;$x<$limit;$x++) {
		$title = str_replace(' & ', ' &amp; ', $feed[$x]['title']);
		$link = $feed[$x]['link'];
		$description = $feed[$x]['desc'];
		$date = date('l F d, Y', strtotime($feed[$x]['date']));
		echo '<p><strong><a href="'.$link.'" title="'.$title.'">'.$title.'</a></strong><br />';
		echo '<small><em>Posted on '.$date.'</em></small></p>';
		echo '<p>'.$description.'</p>';
	}
}
?>

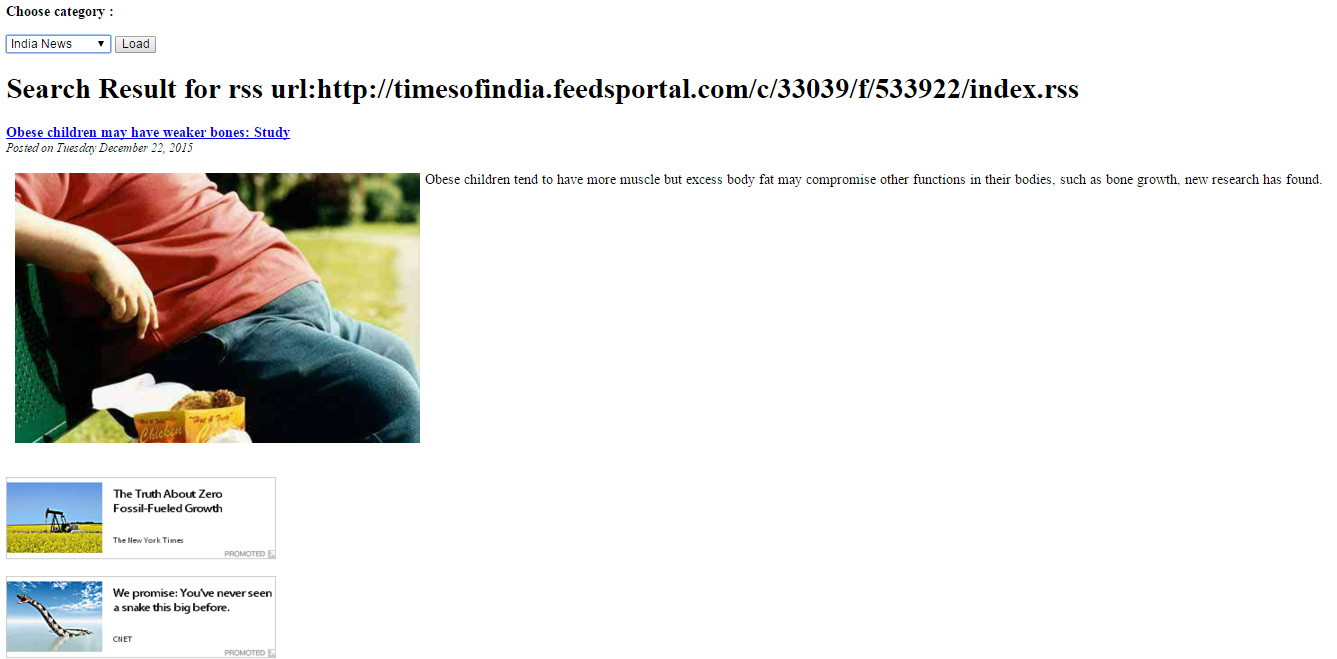
Conclusion : Select your category and click on go button and you will see the fetched news from rss feed.

read rss using php script

Steps to create dynamic multilevel menu using php and mysql

Hi Geeks,
Today i am sharing you ” Steps to create dynamic multilevel menu using php and mysql” which can be called “example of recusion in php & mysql”.
What Exactly recursion is ?
Recursion is a technique or Algorithm by which we can go and return the collection of sequenced data with n depth. It is a condition based child search and return the output to the previous stepped varriable’s scope.
we can solve many of the programming problems using recursion.
In following Example we will sort out a problem where we need to show nested n number of depth relation saved in mysql menu table with having proper opening and closng the <ul> and <li> tags in html.
Following are the steps :

Step 1. Create a mysql Table in your database by executing following sql statement

--
-- Table structure for table `menu`
--

CREATE TABLE IF NOT EXISTS `menu` (
  `menu_id` int(11) NOT NULL AUTO_INCREMENT,
  `menu_name` varchar(255) NOT NULL,
  `parent_id` int(11) NOT NULL DEFAULT '0' COMMENT '0 if menu is root level or menuid if this is child on any menu',
  `link` varchar(255) NOT NULL,
  `status` enum('0','1') NOT NULL DEFAULT '1' COMMENT '0 for disabled menu or 1 for enabled menu',
  PRIMARY KEY (`menu_id`)
) ENGINE=InnoDB  DEFAULT CHARSET=latin1 AUTO_INCREMENT=37 ;

--
-- Dumping data for table `menu`
--

INSERT INTO `menu` (`menu_id`, `menu_name`, `parent_id`, `link`, `status`) VALUES
(1, 'Home', 0, '#home', '1'),
(2, 'Web development', 0, '#web-dev', '1'),
(3, 'WordPress Development', 0, '#wp-dev', '1'),
(4, 'About w3school.info', 0, '#w3school-info', '1'),
(5, 'AWS ADMIN', 2, '#', '1'),
(6, 'PHP', 2, '#', '1'),
(7, 'Javascript', 2, '#', '1'),
(8, 'Elastic Ip', 5, '#electic-ip', '1'),
(9, 'Load balacing', 5, '#load-balancing', '1'),
(10, 'Cluster Indexes', 5, '#cluster-indexes', '1'),
(11, 'Rds Db setup', 5, '#rds-db', '1'),
(12, 'Framework Development', 6, '#', '1'),
(13, 'Ecommerce Development', 6, '#', '1'),
(14, 'Cms Development', 6, '#', '1'),
(21, 'News & Media', 6, '#', '1'),
(22, 'Codeigniter', 12, '#codeigniter', '1'),
(23, 'Cake', 12, '#cake-dev', '1'),
(24, 'Opencart', 13, '#opencart', '1'),
(25, 'Magento', 13, '#magento', '1'),
(26, 'Wordpress', 14, '#wordpress-dev', '1'),
(27, 'Joomla', 14, '#joomla-dev', '1'),
(28, 'Drupal', 14, '#drupal-dev', '1'),
(29, 'Ajax', 7, '#ajax-dev', '1'),
(30, 'Jquery', 7, '#jquery-dev', '1'),
(31, 'Themes', 3, '#theme-dev', '1'),
(32, 'Plugins', 3, '#plugin-dev', '1'),
(33, 'Custom Post Types', 3, '#', '1'),
(34, 'Options', 3, '#wp-options', '1'),
(35, 'Testimonials', 33, '#testimonial-dev', '1'),
(36, 'Portfolios', 33, '#portfolio-dev', '1');
--

Step 2.  Connect with database

<?php
//create a mysql connection 
$con=mysqli_connect("localhost","root","","test");// we have used db name test you can change your db name
// Check connection
if (mysqli_connect_errno())
{
  echo "Failed to connect to MySQL: " . mysqli_connect_error();
}
?>

Step 3. Implement the recursion logic

<?php
function get_menu_tree($parent_id) 
{
	global $con;
	$menu = "";
	$sqlquery = " SELECT * FROM menu where status='1' and parent_id='" .$parent_id . "' ";
	$res=mysqli_query($con,$sqlquery);
    while($row=mysqli_fetch_array($res,MYSQLI_ASSOC)) 
	{
           $menu .="<li><a href='".$row['link']."'>".$row['menu_name']."</a>";
		   
		   $menu .= "<ul>".get_menu_tree($row['menu_id'])."</ul>"; //call  recursively
		   
 		   $menu .= "</li>";

    }
    
    return $menu;
} 
?>

Step 4: Ininitialize  start the Recursion in Parent Content Holder

<ul class="main-navigation">
<?php echo get_menu_tree(0);//start from root menus having parent id 0 ?>
</ul> 

Step 5: Close the Mysql connection

<?php mysqli_close($con); ?>

Step 6. <ul> <li> depth css implementation in style tag in head section

<style>
ul {
  list-style: none;
  padding: 0;
  margin: 0;
  background: #1bc2a2;
}

ul li {
  display: block;
  position: relative;
  float: left;
  background: #1bc2a2;
}

/* This hides the dropdowns */


li ul { display: none; }

ul li a {
  display: block;
  padding: 1em;
  text-decoration: none;
  white-space: nowrap;
  color: #fff;
}

ul li a:hover { background: #2c3e50; }

/* Display the dropdown */


li:hover > ul {
  display: block;
  position: absolute;
}

li:hover li { float: none; }

li:hover a { background: #1bc2a2; }

li:hover li a:hover { background: #2c3e50; }

.main-navigation li ul li { border-top: 0; }

/* Displays second level dropdowns to the right of the first level dropdown */


ul ul ul {
  left: 100%;
  top: 0;
}

/* Simple clearfix */


ul:before,
ul:after {
  content: " "; /* 1 */
  display: table; /* 2 */
}

ul:after { clear: both; }
</style>

Conclusion : Complete Code in one File.

<!doctype html>
<html>
<head>
<meta charset="utf-8">
<title>create dynamic multilevel menu using php and mysql</title>
<style>
ul {
  list-style: none;
  padding: 0;
  margin: 0;
  background: #1bc2a2;
}

ul li {
  display: block;
  position: relative;
  float: left;
  background: #1bc2a2;
}

/* This hides the dropdowns */


li ul { display: none; }

ul li a {
  display: block;
  padding: 1em;
  text-decoration: none;
  white-space: nowrap;
  color: #fff;
}

ul li a:hover { background: #2c3e50; }

/* Display the dropdown */


li:hover > ul {
  display: block;
  position: absolute;
}

li:hover li { float: none; }

li:hover a { background: #1bc2a2; }

li:hover li a:hover { background: #2c3e50; }

.main-navigation li ul li { border-top: 0; }

/* Displays second level dropdowns to the right of the first level dropdown */


ul ul ul {
  left: 100%;
  top: 0;
}

/* Simple clearfix */


ul:before,
ul:after {
  content: " "; /* 1 */
  display: table; /* 2 */
}

ul:after { clear: both; }
</style>
</head>

<body>
<?php
$con=mysqli_connect("localhost","root","","test");
// Check connection
if (mysqli_connect_errno())
{
  echo "Failed to connect to MySQL: " . mysqli_connect_error();
}

// Perform queries 
 
function get_menu_tree($parent_id) 
{
	global $con;
	$menu = "";
	$sqlquery = " SELECT * FROM menu where status='1' and parent_id='" .$parent_id . "' ";
	$res=mysqli_query($con,$sqlquery);
    while($row=mysqli_fetch_array($res,MYSQLI_ASSOC)) 
	{
           $menu .="<li><a href='".$row['link']."'>".$row['menu_name']."</a>";
		   
		   $menu .= "<ul>".get_menu_tree($row['menu_id'])."</ul>"; //call  recursively
		   
 		   $menu .= "</li>";

    }
    
    return $menu;
} 
?>
<h1>Create Nested menu Tree by Mysql php</h1>
<ul class="main-navigation">
<?php echo get_menu_tree(0);//start from root menus having parent id 0 ?>
</ul> 

</body>
</html>
<?php mysqli_close($con); ?>


Implement caching in php website

Hi Experts,
Today i am sharing you Step by Step instructions for Implement caching in php website.
First of all we have to understand that what is cache exactly and how cache exactly works .
What is cache ?
Cache is a technique to optimize web page speed,load time and execution . it just reduces database calls and load by delivering contend by cached pages or objects which we saved in file-system or objects .We can Achieve cache with multiple logic like File Storage Cache(Most popular & this article is about itself),Object Stored cache( like Memcache),Application level cache (like Varnish Cache) ,SQL Query Cache.
Simply Cache is not a logic or program it is just a concept and that can be achieve with multiple logic or programs/techniques as above.
Now See that How Cache works with Server and Client See in Following Figure.

cached-file-example

Now Step by Step Implement caching in php website
Step 1 : Create a Cache class with file name cache.class.php in your website root directory

<?php class cache{

public $cache_ext; 
public $cache_time; 
public $cache_folder;
public $ignore_pages;
public $dynamic_url;
public $_ignore_status; 
public $_cache_file; 


public function __construct($cache_ext  = '.html',$cache_time = 3600,$cache_folder   = 'cache_gen/',$ignore_pages   = array(),$cache_enable=1) 
{
	  
	$this->cache_ext=$cache_ext;
	$this->cache_time=$cache_time;
	$this->cache_folder=$cache_folder;
	$this->ignore_pages=$ignore_pages;
	$this->dynamic_url    = "http://".$_SERVER['HTTP_HOST']. $_SERVER['REQUEST_URI'] . $_SERVER['QUERY_STRING'];
	
      $this->_cache_file     = $this->cache_folder. md5($this->dynamic_url).$this->cache_ext; 
      $this->_ignore_status = (in_array($this->dynamic_url,$this->ignore_pages))?true:false;
if($cache_enable==1)	
{
	if (!$this->_ignore_status && file_exists($this->_cache_file) && time() - $this->cache_time < filemtime($this->_cache_file)) { //check Cache exist and it's not expired.
		ob_start('ob_gzhandler'); //Turn on output buffering, "ob_gzhandler" for the compressed page with gzip.
		readfile($this->_cache_file); //read Cache file
		echo '<!-- cached page by cache class by w3school - '.date('l jS \of F Y h:i:s A', filemtime($this->_cache_file)).', Page : '.$this->dynamic_url.' -->';
		ob_end_flush(); //Flush and turn off output buffering
		exit(); //no need to proceed further, exit the flow.
	}
}
	 //Turn on output buffering with gzip compression.
	ob_start('ob_gzhandler'); 
}


}

?>

Step 2 : Put Following code Before your website header file/template file or any file where you want to achieve cache.
Note : this code should be always upper from your <html> tag starts.

<?php
include 'cache.class.php';

//parameters list//
$cache_ext  = '.html';//cache file extension
$cache_time = 3600; //in seconds eg: 3600=60*60 means 1 hour cache time you can change it also
$cache_folder   = 'cache_gen/'; //folder in which you want to save cache
$ignore_urls   = array();//define a array with full url which you want to ignore for generating cache.
$cache_enable=1; //0 for disable caching and 1 for enable caching functionality.
//parameters list//
$cache_obj=new cache($cache_ext,$cache_time,$cache_folder,$ignore_urls,$cache_enable);

?>

Step 3 : In the Footer template or page just After the </html> close tag.

<?php

if (!is_dir($cache_obj->cache_folder)) { //create a new folder if we need to
    mkdir($cache_obj->cache_folder);
}
if(!$cache_obj->_ignore_status){
    $fp = fopen($cache_obj->_cache_file, 'w');  //open file for writing
    fwrite($fp, ob_get_contents()); //write contents of the output buffer in Cache file
    fclose($fp); //Close file pointer
}
ob_end_flush(); //Flush and turn off output buffering

?>

Step 4 : Check you page and see that for the time you set in code or by default 1 hour you webpage will give same output for all users very quickly.
Question : how to verify that cache is implemented or not
Answer : load your webpage where you implement this cache system after it CTRL+U or see page source. in that in last of your code there will be a html comment having following text
” cached page by cache class by w3school ”
Now Enjoy the Script by https://www.w3school.info/

How to remove index.php from Codeigniter url

Here we will learn how to remove index.php from codeigniter url.

Each of codeigniter constructed url contains the value index.php and excluding root url. No url cannot be run without index.php

Assume a scenario , we have a website named www.myciportal.com

Where we didn’t remove the index.php from url and i have a category with following details

category name: techbuzz

So by default it’s url will create like  following

default url : www.myciportal.com/index.php/techbuzz

it will not run like this way

www.myciportal.com/techbuzz

For make this possible we have to work on config and htaccess both and steps are following to achieve this task

If you are using mod_rewrite to remove the index.php in each url construct of codeigniter then you have to follow these steps:
Step 1: In CI Project root Folder of your project create a .HTACCESS file and place following code in it

RewriteEngine on
RewriteBase /myprojectname
RewriteRule ^(application|system|\.svn) index.php/$1 [L]
RewriteCond %{REQUEST_FILENAME} !-f
RewriteCond %{REQUEST_FILENAME} !-d
RewriteRule ^(.*)$ index.php/$1 [QSA,L]

Comments :: In above code myprojectname is passed with RewriteBase , which is the demo project name of our ci project,if you are running on main domain then Redirect base will be / only , or if you are running your project in any directory then you have to specify that name.
Now Step 2:
in your project >> application/config/config.php
Replace following line

$config['index_page'] = 'index.php'; 

with

$config['index_page'] = ''; //removed the index.php after htaccess done

Now you can run your Codeigniter project and you can see the index.php has been removed from every Controller Action

How to Make First PHP Program?

Hi Friends,

Before writing first PHP Program, you will have to set the environment. And, for make this, you need to install the Xampp server in your system.

After successful installation, we need a code editor, there are several code editors like Notepad++, Code Lobster, Netbeans etc. You can use any code editor as per your comfort for writing code.

First off, go to the drive where you have installed the Xampp server. Click on Xampp and go to the htdocs folder. But don’t forget to start Xampp control panel and Apache, MySql services before writing the code. Now create a folder for your project with any name. Suppose we create a folder name myproject.

Now inside this folder create a file name index.php. Below is the snippet for creating your first PHP program:

<?php 

//all code should be come in between the start and ending tags of PHP

?>

Program for Print Hello W3school

<?php

echo "Hello W3school";

?>

echo is a php function used for print/display on web browsers.

Now Run in localhost by following address

http://localhost/myproject/index.php

This will print the output as follows

Hello W3school


Now we have done with “how to make first PHP program,” we will learn about the if – else statements, switch cases, array, data retrieval from database and many more, which are important to create a complete website.

How to Install Xampp Server?

XAMPP  is a free  web server package developed by Apache Friends. It consists interpreters for code written in PHP programming language, and it has few other elements also which are as follows:

  1. Apache: It’s an application server which must be installed in machine to run a PHP program.
  2. Mysql:  A database system for data storage in tables.
  3. PHP: A server side scripting language, widely used for dynamic website creation.

Now follow the link to download and install Xampp server according to your operating systems whether it is Windows, Linux or Unix.

Download Xampp from it’s Official Website click here

After downloading the setup file you can access the url by http://localhost/

Create any program or Project you can see in this article

PHP Tutorial for Beginners – An Introduction

PHP (PHP Hypertext Preprocessor) is a web development scripting language which is widely used for creating dynamic websites and portals.

It Supports oops (object oriented programming standards). Top 5 frameworks which are very popular these days in web development are written in php, which are as follows:

  • Laravel (Completely written in Symphony Objects)
  • Symphony (Very Powerful Framework)
  • CodeIgniter
  • Zend (acquired PHP itself)
  • Cake PHP

All of these frameworks follow MVC (Model,View,Controller) architecture. It also has several cms also. We are providing a brief overview here:

WordPress: It is basically built for blogging websites, but now you can make any informative web portals and using its woo-commerce extension, you can make e-commerce website also.
Joomla: Web Portal development can be used for Ecommerce and News Portal and Great CMS.
Drupal: Drupal is also most popular and advance level cms and can be used possibly for every type of web portals, including blog, magazine, newspaper, e-commerce. This can be used for any other complex cms also.

Like these cms, few shopping cart solutions are also popular in this competitive market. They are listed below
Magento: We can say it an e-commerce king as it is widely used for enterprise level e-commerce websites.
Opencart: A very lightweight cart solution and it is ready to use for medium level e-commerce projects
Prestashop: it is also very useful shopping cart solution, widely used in the United Kingdom for creating shopping websites and portals.

So, my dear friends, you have experienced our first PHP TUTORIAL. We will keep you update with our further web development tutorial series also.